INTRODUCTION
Tormentum: Dark Sorrow is a powerful, haunting, and surreal world that manages to create a sense of unease in the player without a whole lot of posturing. If you’d like my full thoughts on the game, see my review, but here I will endeavor to provide guidance for it. Tormentum already provides in-game hints for many of its puzzles, but that doesn’t completely eliminate the challenge. Key items can be missed, puzzles can still be confusing, and what about those moral choices? I should note that a major part of Tormentum’s experience is the kind of choices you make. When playing the game naturally, some of the choices seem less clear. Reading this guide, however, could lessen the impact of the story for you by removing that state of uncertainty. Believe me, the morality is less obvious when playing the game unaided for the first time. If this isn’t a concern, then just know that Tormentum has a fairly binary morality system, so one playthrough should give you an idea of what to do if you want to get the other achievements.
What this guide will not do, is summarize story events. I mention consequences as necessary, but if you want to know everything that happens in detail, you must play the game!
THE BASICS
Movement
The user interface for this game is simple. You don’t manually walk your character (hereby referred to as the Ragman) through areas, but rather, each screen has items that you can interact with by clicking on them. To move from area to area, you scroll by moving your mouse to the edge of the screen and click the corresponding silver arrow. Sometimes arrows are in the middle of the screen, indicating some location off in the distance.
User interface
Your notes are in the lower left corner. Whenever the Ragman finds something noteworthy, he documents it here automatically. FYI, there’s an achievement for not ever looking at the notebook. In the lower right corner is your inventory. Clicking on this opens your pack, revealing all your items. Choosing one item, you can then use it in the area. This game doesn’t require you to combine items, so don’t bother wasting your time doing that!
Examine everything!
While this is a rather obvious thing to do in an adventure game, I want to stress this because Tormentum has a lot of optional material that players do not need to examine in order to complete the game. However, examining these things can net you achievements, and also deepens your understanding of the setting. I’ll alert you when there are such things in an area, but it would be a waste of time to attempt to list every little thing. Key items pulse with light, while items you can interact with might puff with smoke. Not everything you can examine in the game does this.
Now, without further ado…
[wp_ad_camp_1]PART ONE: ESCAPING THE CASTLE PRISON
Breaking out of your cell
After the intro sequence completes, you find yourself in a prison cell, awaiting torture by the horned guards. Time to make our escape!
First, take a look at the paper that is nailed to the wall near the window. We’ll need this later.
Click on the skull sitting up in the bunk to the left. Don’t worry, that’s supposed to happen!
We’re going to need something to get that red marble thing. So for that, let’s take a look at the skeleton lying on the floor. Click on him, and his arm falls off. Take it.
Use the skeleton arm to fetch the marble. Turns out it’s a crystal eye.
Now it’s time to look at the window with the crow. Click on the item it has in its beak.
Let’s take a look at our cell door now. You’ll see the back of the cell lock. Take the rusty plate you got from the bird, and use it on all the screws. Now it’s time for our first major puzzle!
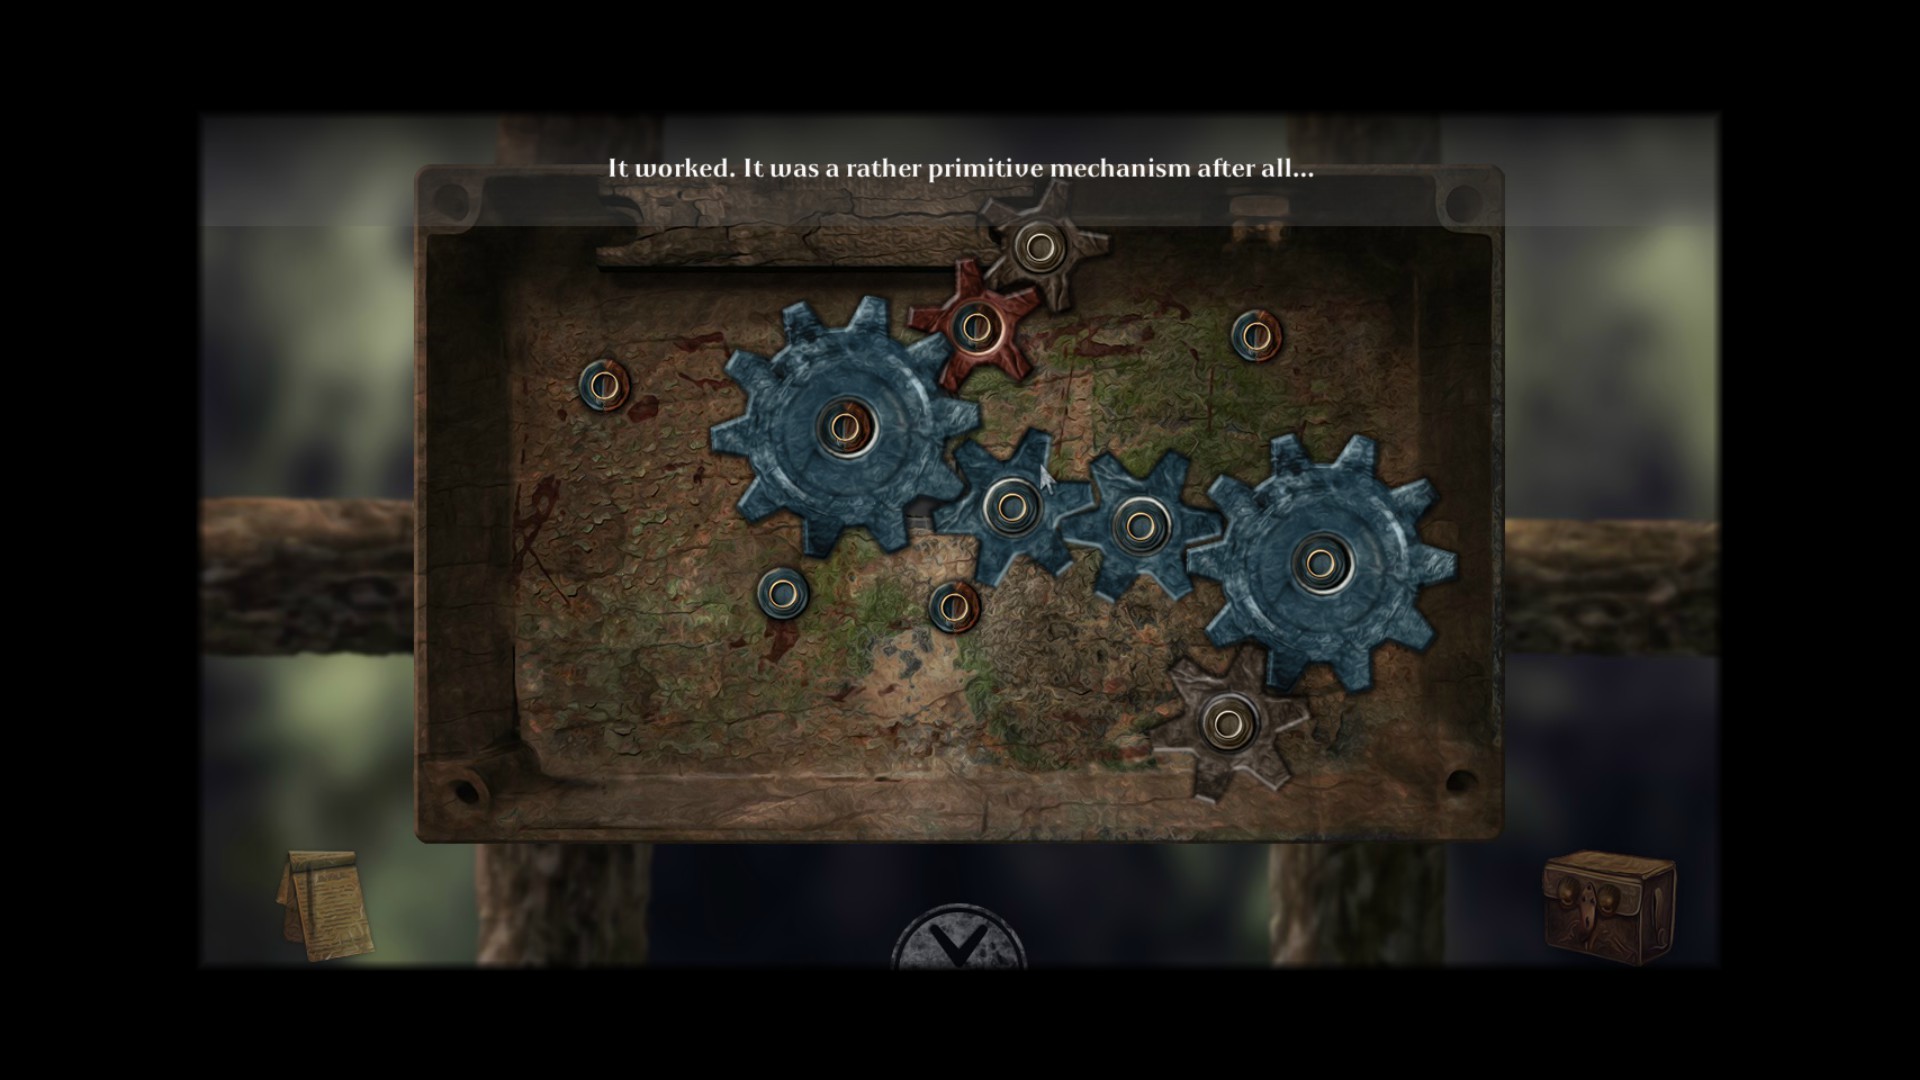
Inside the lock mechanism, you’ll see a number of cogs that are two different colors. On the lock’s panel, there are pegs with certain colors. Some are red and blue, others only blue. What we want to do is get all the cogs to fit into the mechanism and get that brown cog at the top turning.
Trial and error will eventually give you the answer, but if you’re impatient or just fed up, just place the cogs like this:
Now before you leave, be sure to take the hanging piece of mirror just beneath the second window outside of your cell. Once you have that, you are ready to proceed.
The stone angel
Speak to the spooky scarred guys in front of the statue, and they will tell you this:
Eyes, so I can see. Heart, so I can feel. Light, to dispel the darkness. The stone angel will show you the way if you meet these three conditions.
First, go ahead and pick up the mirror shard propped up on the chair to the right. Proceed to the area to the right. We’ll be returning to this room.
Pick up the mirror shard next to the empty well. Move your cursor furthest to the right. On the far right, there is a cage with another mirror shard. Open this and take it. You now have all the mirror shards.
In the back of the cage area is a hole with some wooden boards that appear to be concealing something. If your screen is dark, you might miss it. Just look between the third and fourth cage. Click on the boards one by one. Take the heart.
Now you might have noticed this room seems familiar. That’s because the first note Ragman took was for this room! But it just gives us what positions the cages should be in at the end. It doesn’t give us an order in which we have to activate them to do that.
Well there are seven cages from left to right. Be sure to move your cursor furthest to the right in order to see the room properly. Let’s take a look at our note again (or not, if you’re trying to get the Total Recall achievement).
See how there’s an X under the fifth cage? That means we start there.
The solution to the cage puzzle is the following (click on the cages of the corresponding number): 5, 3, 4, 1
Look at the well again. It has filled with water, and the crystal eye that had been at the bottom is now in our reach. Take it.
Return to the stone angel room.
Put all the mirror shards in the left mirror.
Look at the candles at the foot of the statue. There’s a piece of wood at the bottom of the screen. Use this with the one lit candle to light the other candles.
Click on the statue’s chest where the heart should be. Put it in.
Just above the angel are two skulls facing each other. Click on them. Put the crystal eyes into the empty eye sockets.
A beam of light has appeared and is now being redirected by the mirrors. You’re going to have to click on the angel’s wings and adjust the mirrors to get the light to create a symbol. What symbol is that? A pentagram of course!
To get this, follow these steps:
- Click the left wing once.
- Click the right wing twice.
- Click the right mirror three times.
Click on the slim door that has been revealed.
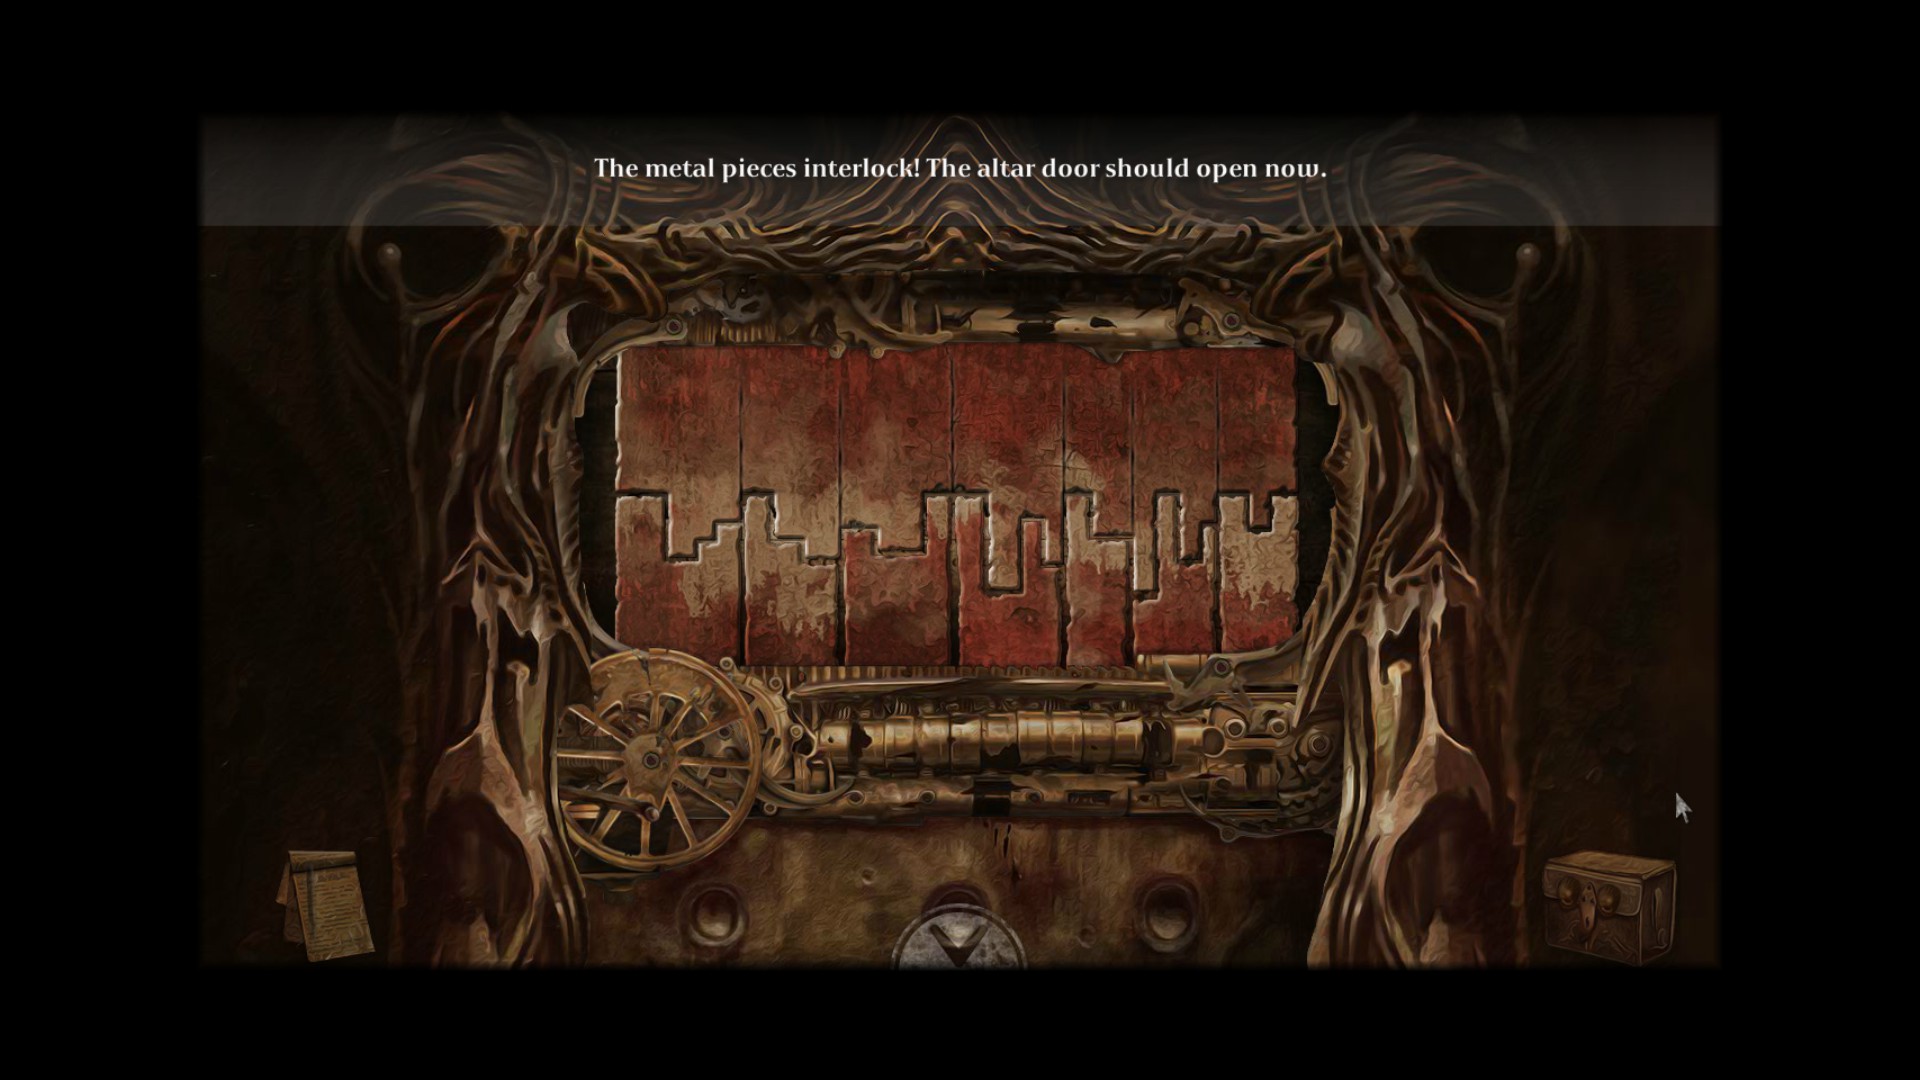
For this puzzle, you want the top half to be able to fit the bottom half. You can only move the bottom half, but you’re missing a piece! Luckily, we got it in the first room. Place the rusty plate into the puzzle to begin.
The bottom has seven pieces from left to right. I’ll refer to these pieces by their numbers. If the pieces are swapped, their number changes. So if I say, swap 7 with 1, the piece that had been “7” will then be referred to as “1” from then on. Okay? Below is the fastest way I could solve this…
Follow these steps for the solution. Swap…
- 7 with 1.
- 5 with 2.
- 4 with 5.
- 5 with 6
- 6 with 7
The end result should look like this:
Click on the door to proceed. We won’t be able to return to these rooms after this, so if there’s anything you’d like to take a look at (nothing here satisfies achievements, just FYI) then do so.
[wp_ad_camp_1]Getting through the giant talking door
The first room we come to is a strange room with skeletons in pods being electrocuted. Click on the skeleton in the center. Click on its head. Now look at the skeleton on the right. Put the head here. We can’t do anything else, so let’s move to the next area located on the right.
Feel free to talk to the big spooky door, but we can’t do anything here yet either, so keep moving to the right!
Oh look! It’s our fellow prisoner, the talking rat. Speak with him. Then pick up the rod on the ground. Return to the pod room.
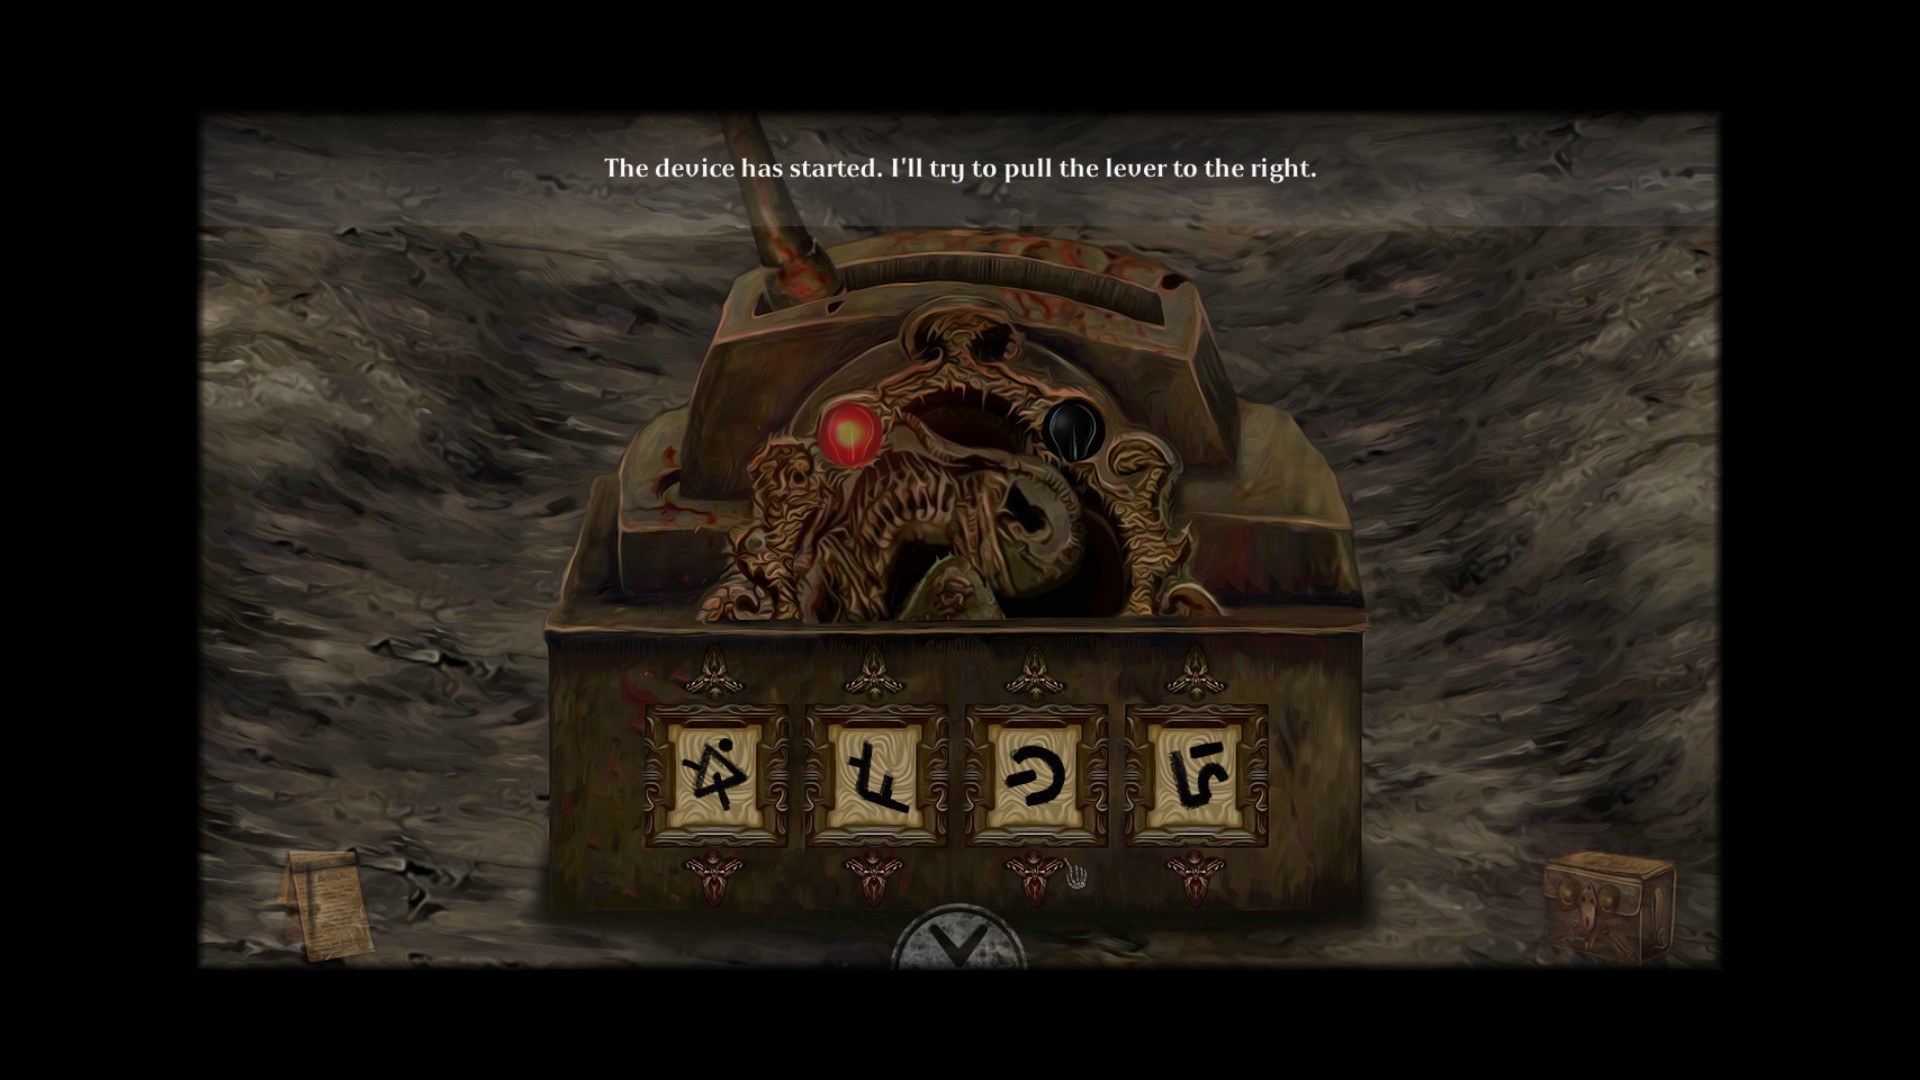
Use the lever on the strange device on the ground. We can’t use it yet. Look at the device. See how there’s symbols on the front panel? We have to get a certain combination in order to be able to pull the lever.
Where have we seen these kinds of symbols? On the wall! Exit from the device screen to return your view to the pod room. Move your cursor from left to right. The symbols you see that parallax in and out of view in the windows? Enter those in the order you see them from left to right by using the arrows above and below each panel window.
The result should look like this:
Pull the lever.
Talk to the ghost. He’ll give you a key. This is what we need to proceed through the big talking door.
Go back to the center room. Look at the pedestal. Place the key in the pedestal.
Look at the mechanism that has been revealed in the door’s chest.
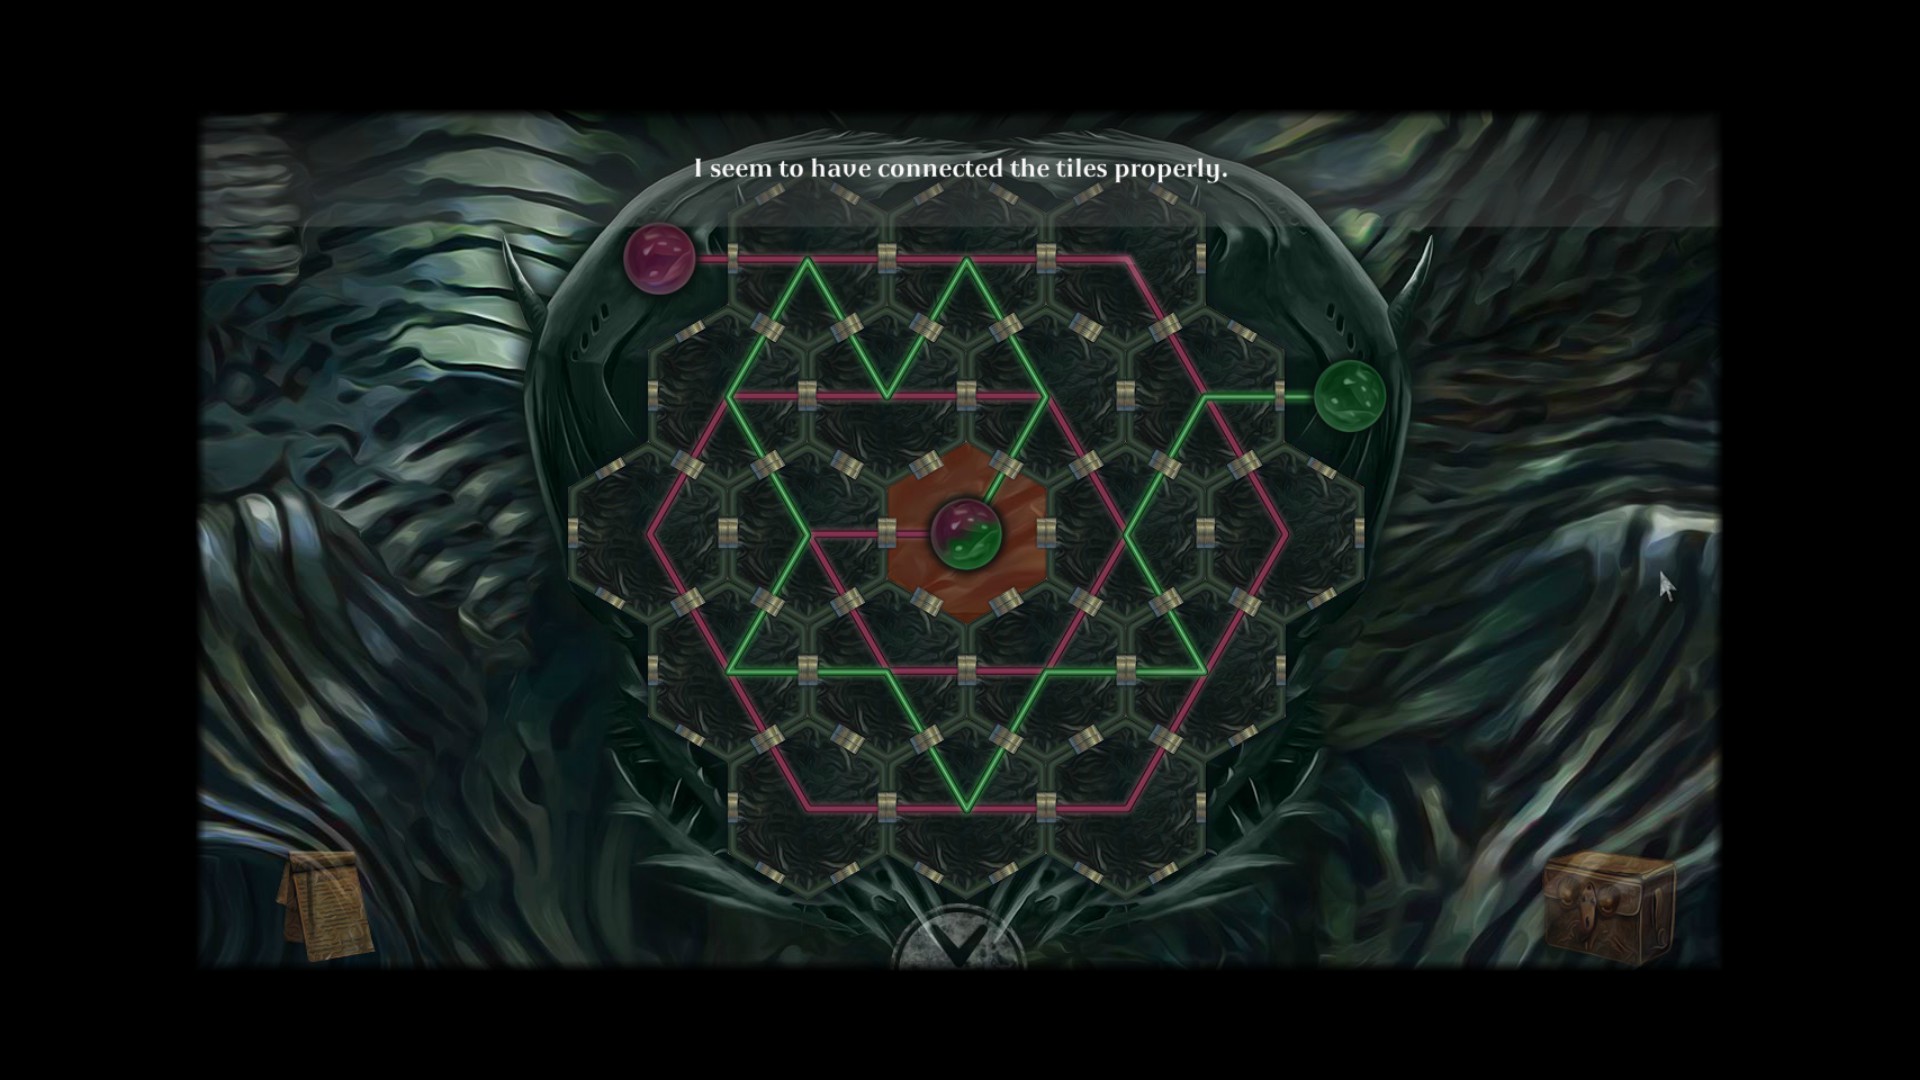
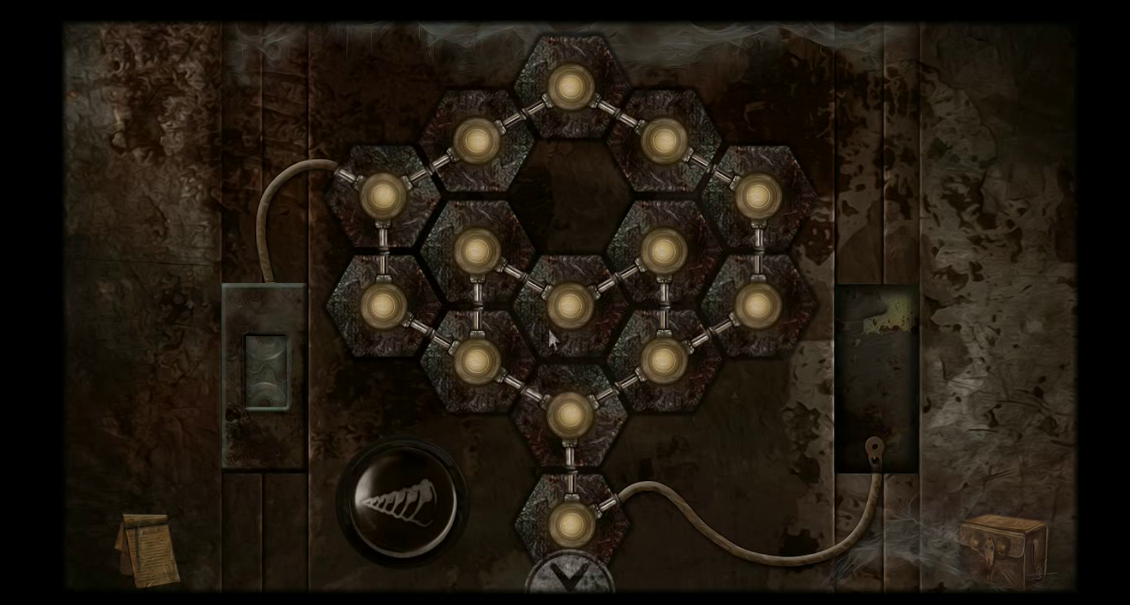
This puzzle looks harder than it is. What we want to do is get the colored lines to match the pulsing marbles on either side, then to connect to the correct side on the center marble. So pink lines for the pink marble, etc.
This one’s a little complicated to explain step-by-step, but if you reference this picture, you should be able to get it:
Take the shiny broken piece that has been revealed in the pedestal. The statues will then separate, and you can proceed forward into a new area.
The jester, the spider, and the giant worm
This portion of the game can be a bit confusing as it is the one time you’ll have access to so many areas at once. We have multiple problems we need to find solutions for, and they will happen in a sort of cascade. Progress to one dilemma leads to progress to another.
To start, let’s talk to the jester. He gives you a bladed key. As you might guess, he presents us with a moral choice that will affect our ending. But we can’t make that decision right now, so let’s just move on.
You can move to the right area to see an alien-looking guard in front of a malfunctioning door. Behind him is the prisoner the jester wants us to kill. Talk to the guard, he won’t hurt you. He mentions that the mechanism for the door is broken in the sewers. Beyond this, we can’t do anything, so return to the throne room.
Go to the left area. You’ll see a room with stairs leading down into the floor out of sight. From behind the wall, we see a kind of giant statute watching us. He won’t let us go down the stairs, so just keep moving left.
Talk to the scary looking guard. Take the shovel he gives you. That drawing he showed looked familiar, right? Let’s go back to the room where the talking door had been.
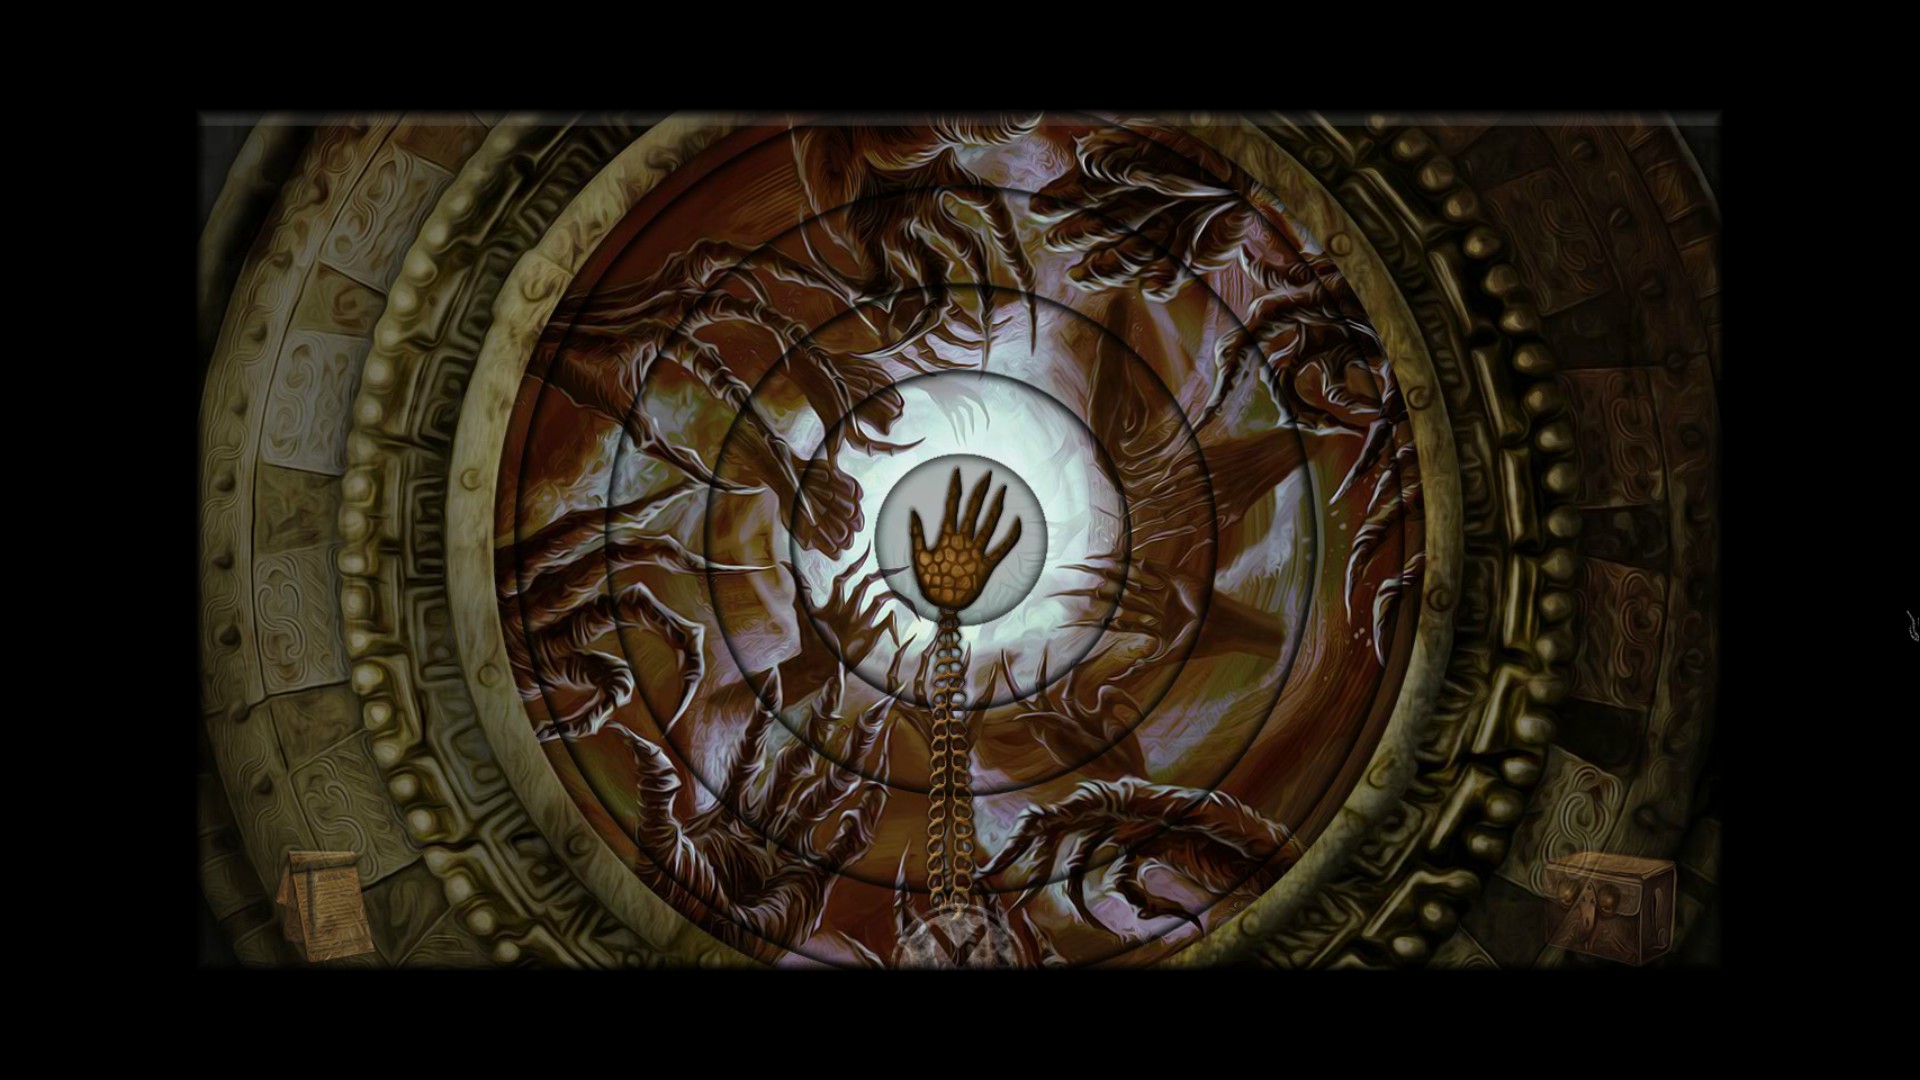
Use the shovel on the cracked soil to the right. Take the lump of gold from the hole you dug. Return to the guard. Pick up the hand-shaped medallion he tosses on the ground. Use the medallion on the spinning dial on the door to the furnace. This stops it spinning, allowing you to solve the puzzle.
This one’s simple. Just get the layers to match up to form a complete picture. The center piece and the very outer rim cannot be moved, serving as your reference. I don’t think the layers stop the same way every time, so you’ll have to just fiddle with it till it is correct. You can click the layers to get them to turn automatically, or click and drag.
The final outcome should look something like this:
Enter the furnace room. Check the locker to the left. Take the weights. Look inside the furnace and take the bone. Look at the picture on the right wall for a new note. Return to the throne room.
Use the bone on the chained monster’s dish. You’ll receive the last green weight. Go to the area to the right, with the giant statue that watches you. Put two weights on the dish to the left, two on the right. That brings down the panels, blocking the statues view of you. You can now go down the stairs.
Look at the two paintings on the wall. Take the ruby eyes. In the lower left of the room, there’s a red wheel. Take it.
Move to the area to the right. It’s a dining room blocked off by a cage, but we don’t need to do anything here now. Keep going to the right. We’re at a room where a door’s pieces keep revolving. To the right of that, a face in the wall is chained up.
This one actually had me confused for a while, but if you look in the lower right corner, you’ll notice something small that is shining. If you move your mouse around, the shadows can cover it up, making it easy to miss. It’s the key we need to unlock the face in the wall. Take it.
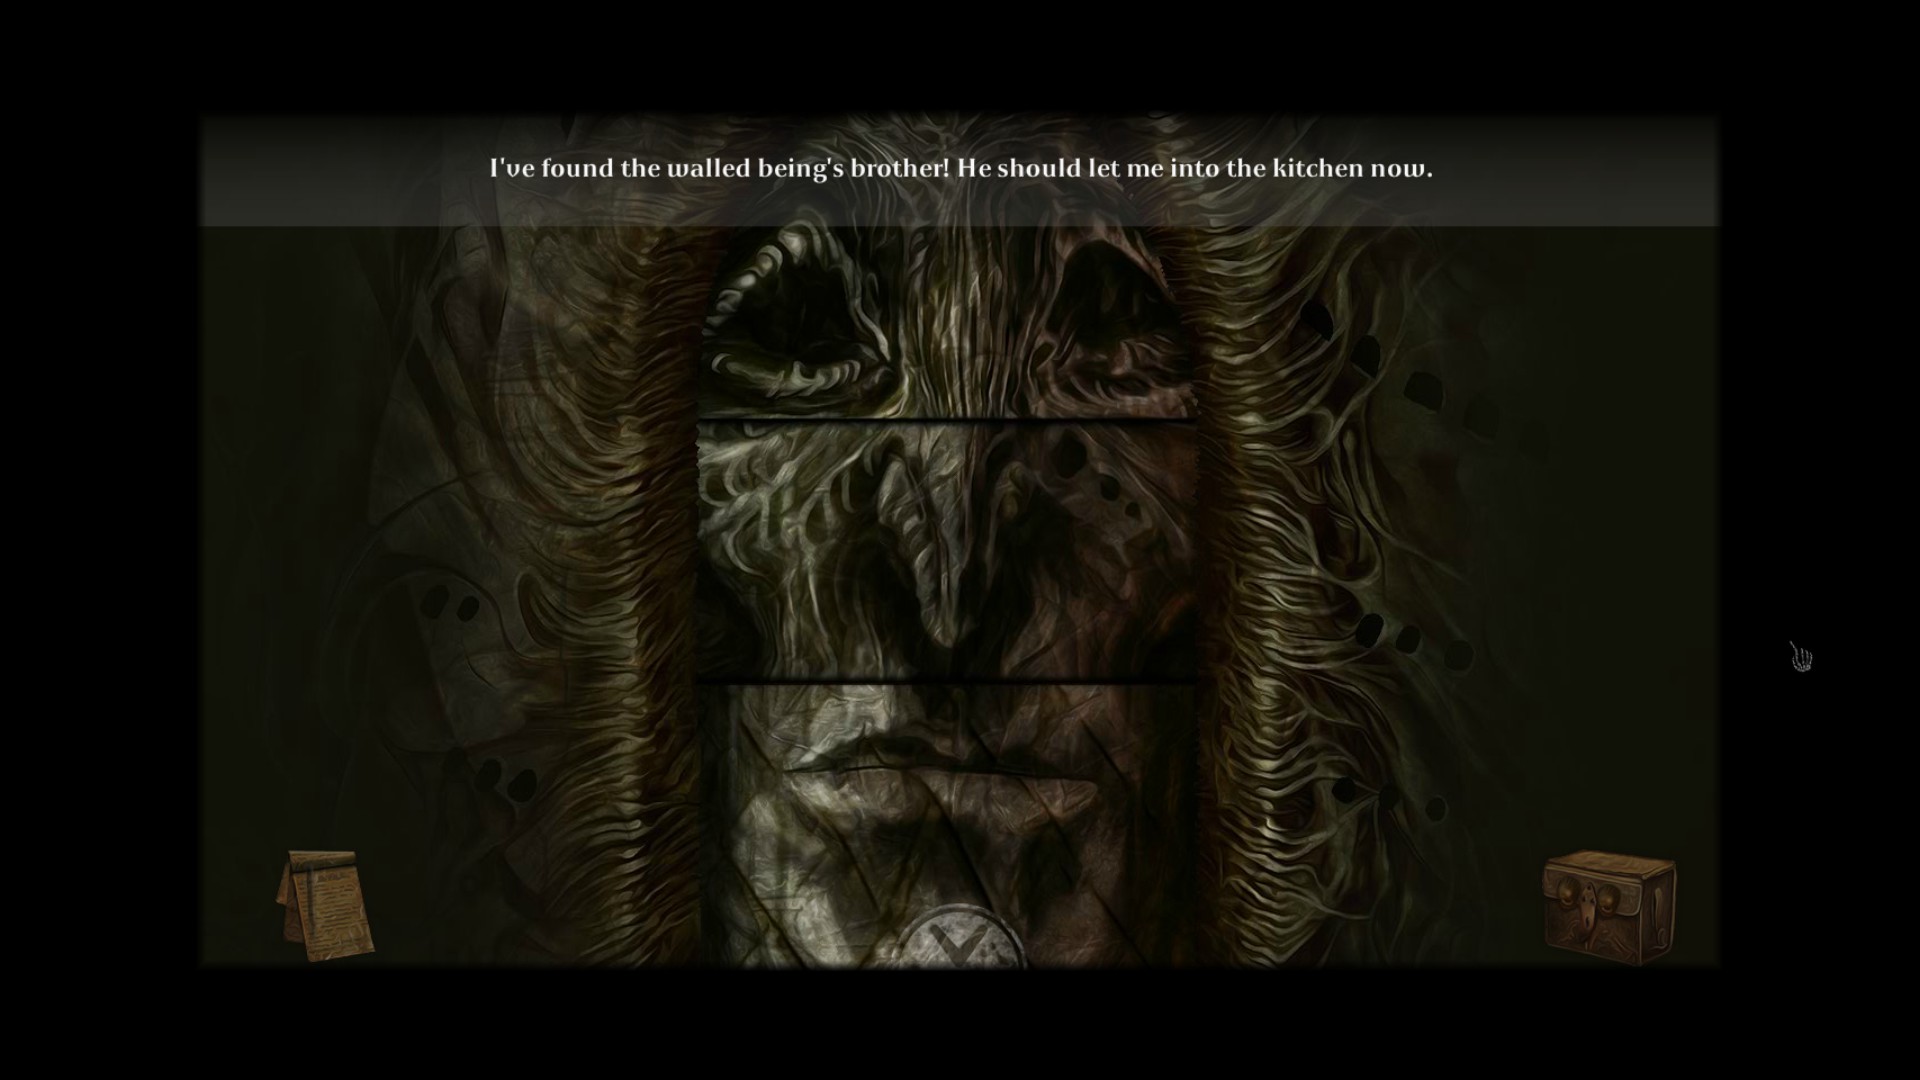
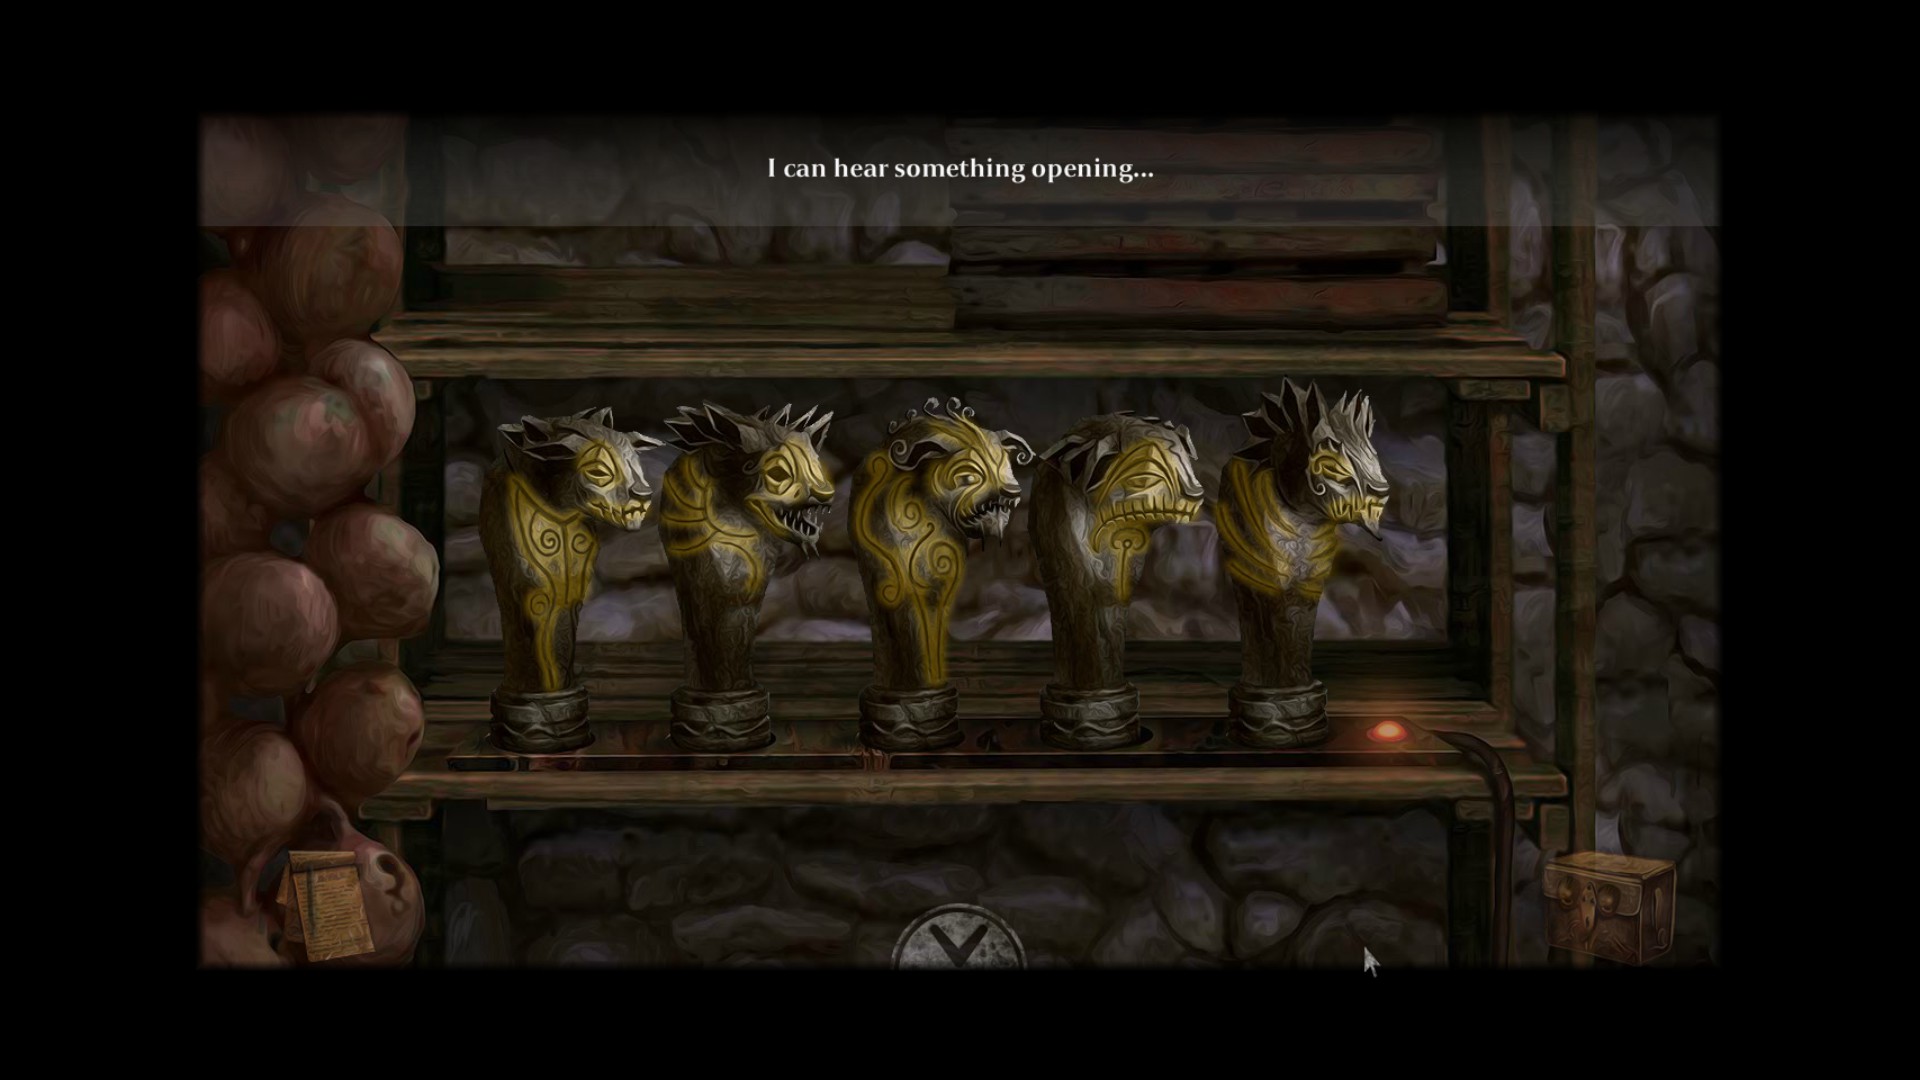
Use the key on the lock. A talking wall is revealed behind the face. He’ll tell you that his brother is the door, and he will let you into the kitchen if you can put him back together. The wall says his brother has:
Big wide open eyes. A long nose which lets him smell everything inside the castle. He is not very talkative, though, his mouth is always shut.
Using those clues, we get this:
Enter the kitchen. Take the lantern hanging on the wall. Look in the sink. Take the belt. Take the skinning knife on the far left. Open the cabinets and take the two skulls inside. Look at the note on the stove.
We have some of the items we need for the furnace, but not all of them. It’s time to pursue another goal.
Return to the room with the two paintings, where we got the red wheel. Head down the hole.
Not a pretty sight, is it? There’s a puzzle here, and it is possible to solve this without the hint you get later on, but it’s unnecessary. Look at the note on the wall. Head down the next hole.
We’re now in the sewers. See the box with the gears? Look at that and use the leather belt on them.
With the water gone, we can now head down the ladder. Do so.
Pick up the medallion piece. Go back up the ladder and return to the caged dining room.
Look at the blue disc on the cage bars. Put the medallion pieces in.
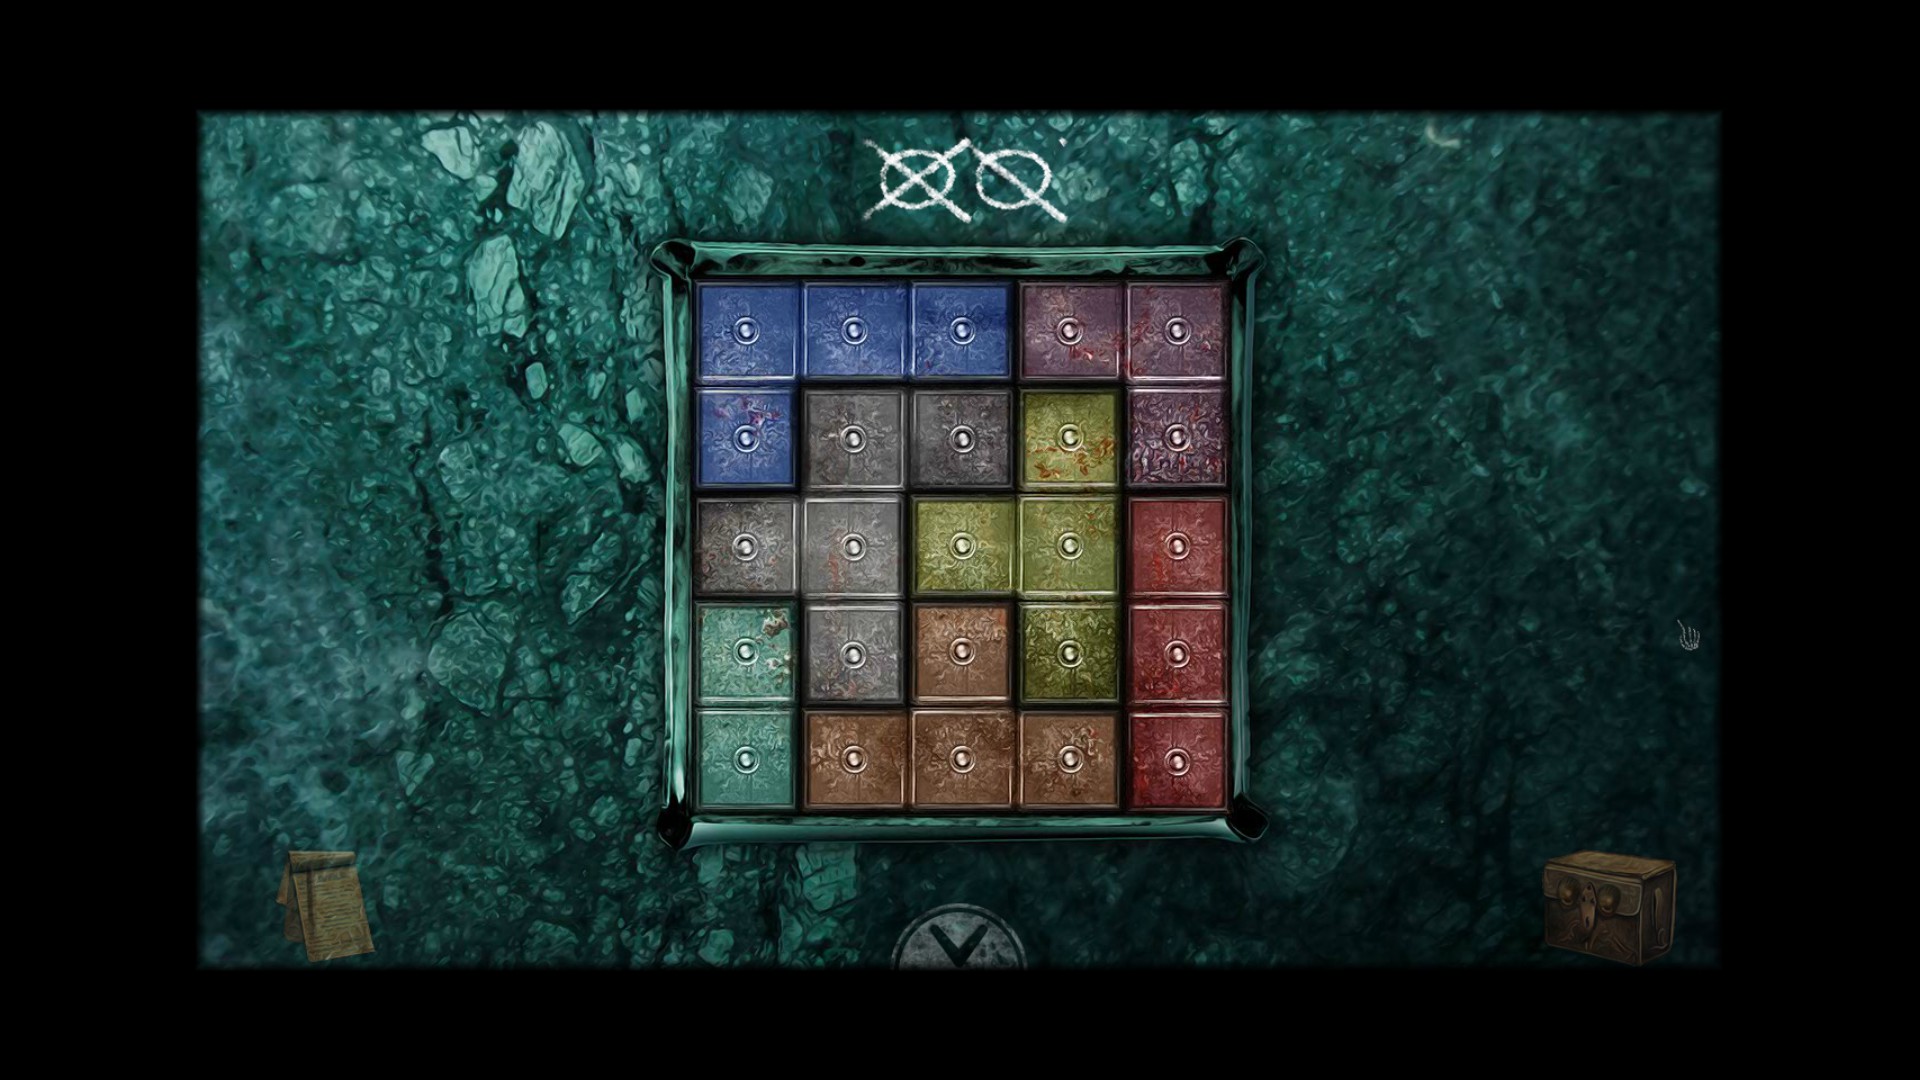
If you’ll recall, we saw a note related to this on the screen where the guard was torturing the prisoner. If you look at the note, it pretty much just gives you the answer, but if you’re going for the Total Recall achievement, just follow this.
From the top going clockwise, count the marbles. There are six total. Click them in this order:
1, 4, 2, 6, 5, 3
Read the note on the left of the table. Take the meat. Take the ruby eye in the statues chest. Let’s return to the bottom of the sewer.
If you haven’t yet, take a look at the periscope on the right. We can see the guard in front of the malfunctioning door. Look at the circular discs on the spider emblem to the left. Put the ruby eyes into the empty slots (including the one with the weight measure).
This is our first moral choice of the game. Depending in what direction you line up the ruby eyes, this will allow you to push the buttons on either side. Here are the moral choice results:
Evil: Choose the right button to have the spider kill the guard.
Good: Choose the left button to spare the guard and fix the door.
This one was sort of obvious, but there are less clear choices later on.
Whatever choice you make, you’ll now have access to the female prisoner, as well as to the spider room. But before we head up there, let’s take care of that puzzle in the room just above the sewer.
Look at the panel on the right. If you’ll recall that note we got from the dining room, it gave us the order we need to click on the springs. From left to right, I will number the springs 1-5. Here’s the solution in case you don’t want to consult your notebook:
1, 1, 1, 4, 4, 3, 3, 5
After that, we have our second moral choice to make.
Evil: Choose the left option to kill the horned guard.
Good: Choose the right option to distract the horned guard.
Go back down the ladder to the sewer. This time, we’re going up the ladder on the left. Pick up the key the guard dropped next to his foot. Let’s return to the room where the female prisoner is being kept.
Talk to the female prisoner. After that, use the bladed key on her. Here is our third moral choice.
Evil: Kill the female prisoner with the bladed key.
Good: Set the female prisoner free.
Let’s go through the spider door. Use the spider-shaped key we acquired from the horned guard. Enter.
Open the drawer for the small dresser. Look at the note inside. The illustration crossed out to he right shows a skull.
Now open the drawer for the large dresser to the left and look inside. It’s the mechanism the note referred to.
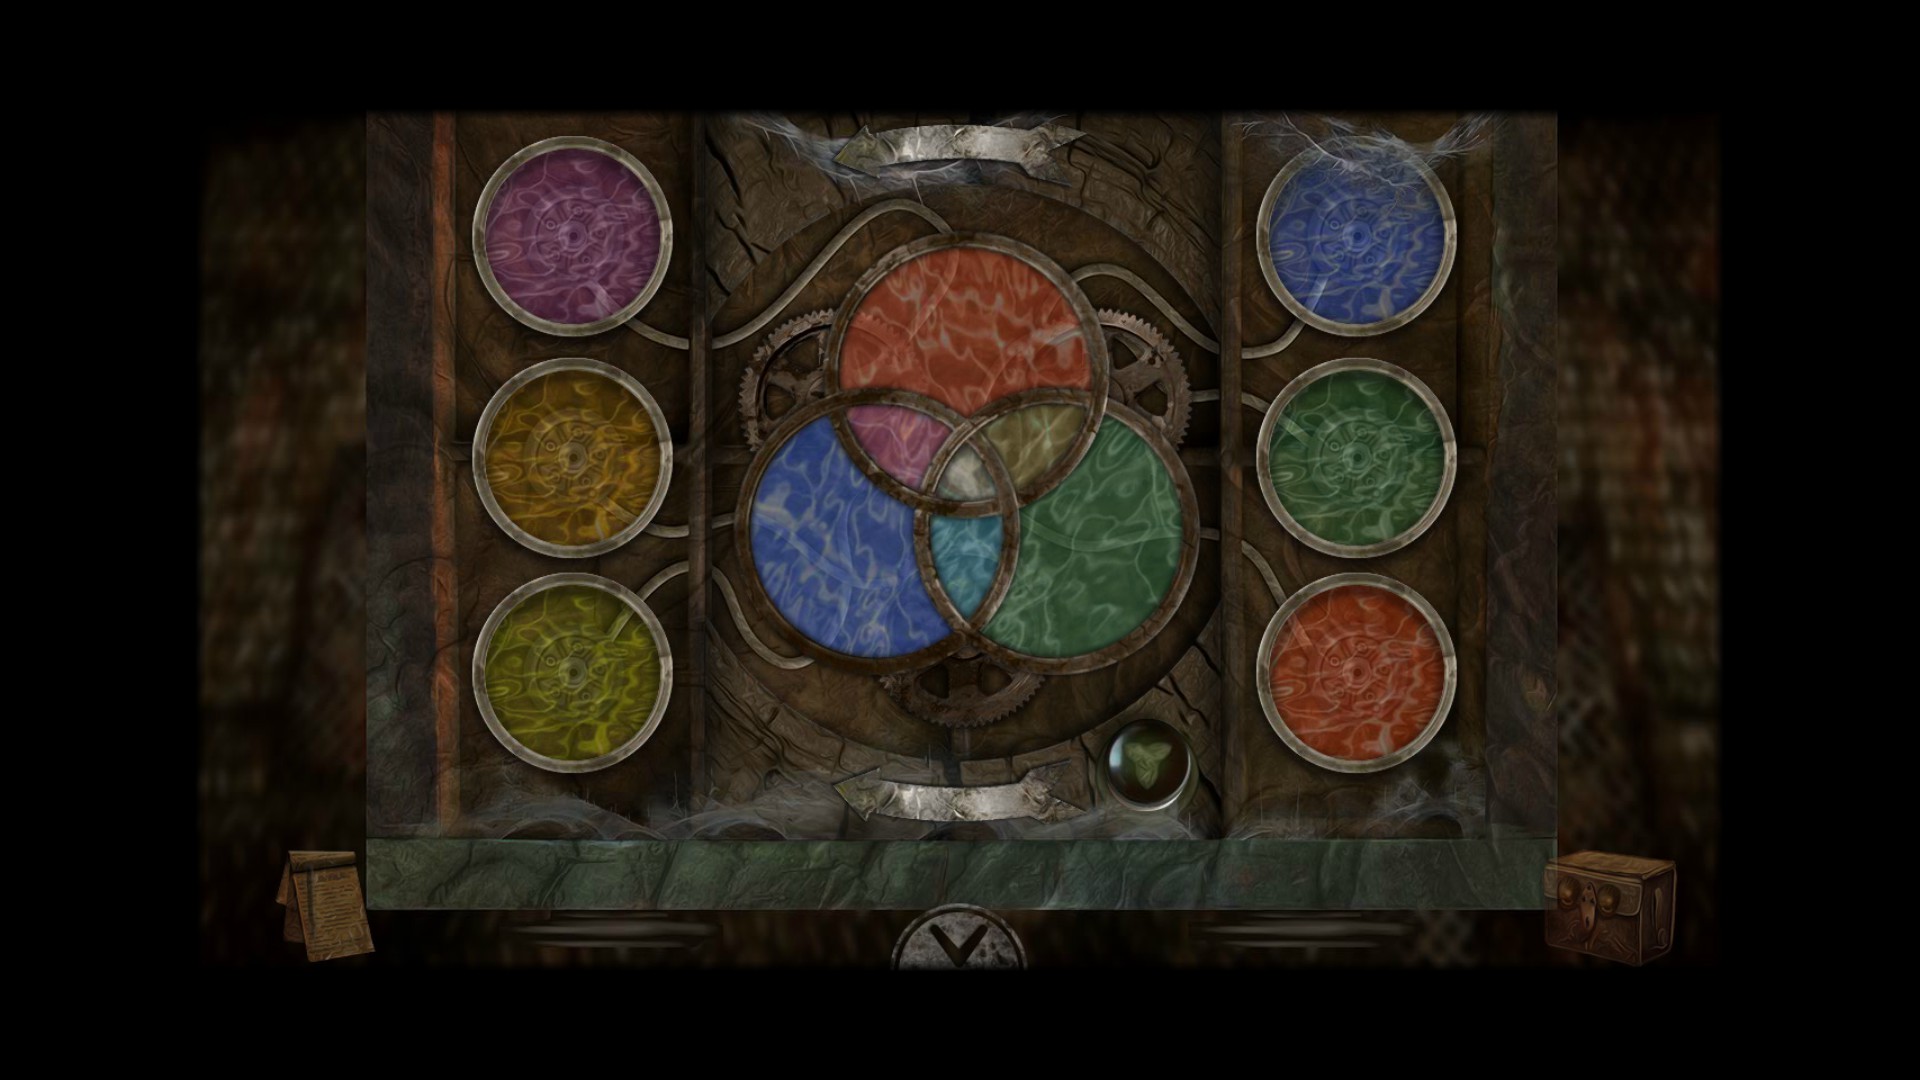
We want red on top, green on the right, and blue on the left. The mechanism has swirling colored discs on both sides. Ignore the ones on the left.
The colors follow a certain logic. Just concern yourself with this: Green always goes on top. So does blue. Red always goes on the bottom right.
With that in mind, place the colors so that they match that of the arrangement with the skull found on the note, like so:
Once you have the diagram correct, hit the button next to the bottom arrow. Take the melted piece of metal.
Examine the puppet. Place the metal piece in the puppet’s forehead. Use the lever next to the small dresser. Take the spider leg. Before you leave, examine the barred window. Take the bird’s nest. Return to the throne room.
Whatever decision you made regarding the female prisoner, you can now see the result in this room. Speak to whomever is sitting on the throne. Take the coin they give you. Return to the furnace room.
Put the valve wheel on its place to the right. Place the bird’s nest inside the furnace. Place the two skulls in the empty space above that. Now hit the dark button below the skulls. Time to return to the kitchen.
Take a look at the pot on the stove. Put the meat in. Then put the spider leg in the meat. Hit the button. Take the meat back. Return to the room with the rat prisoner.
Give the poisoned meat to the giant worm. Examine the lever in the middle of the screen. Pulling the lever left or right activates the button to be pressed. Now we have our fourth moral choice.
Evil: Left button. Kill the rat prisoner by dropping him onto the spikes.
Good: Right button. Release the rat prisoner from his cage.
Take the coin on the ground. Head down the ladder.
Read the note on the left. Examine the pile of bones. You can move the bones to better reveal what’s underneath, but if you’re impatient like me, just click exactly on the green thing in the center and you’ll be done. If you’re having trouble doing that, just move the topmost bone off to the side. If any bone is over the bone you’re trying to move, you won’t be able to pick it up.
Now use the skinning knife on the dead worm. Take the tear-shaped emerald. Leave this area.
We can finally go out the glowing door!
The gate to freedom
Head down the rope. Ignore the glowing hole and head down again.
Speak with the cloaked woman. Take the cloth off the round structure. Don’t worry! That’s supposed to happen. Climb back up the rope.
Enter the glowing hole. Look at both paintings. Head left. Use the cloth on the left door. Enter the door on the right.
Examine the chest to the far right. We need to move the pieces so that the keyhole is accessible. Below is a quick video showing the solution.
Use the key on the revealed keyhole. Take what’s inside the chest. Now talk to the distressed fellow in the chair. Click on the items on the table that have been revealed.
This puzzle has two stages. Fit the pieces in and you move onto the next stage. Below are the screenshots of the solutions:
Solution #1
Solution #2
With the being gone, we can remove the curtain from the wall in the back. It’s a painting of the female prisoner from earlier. In the corners of the paintings are those familiar symbols. Arrange the symbols as the Ragman noted down so that it looks like this:
The painting moves aside to reveal a doorway. Enter.
Place the lamp we got from the kitchen on the dresser to the right. Check the dresser drawer and cabinet. In case you’re wondering, taedium vitae roughly translates to “boredom of life.” Take the tear-shaped emerald from the cabinet.
Open the leftmost coffin. Take the coin. Return to the room where we covered the door with the cloth. The left is a strange machine. Put the glowing crystal inside the machine. Let’s return to the gate with the three-headed dog.
Looks like the dog is taken care of. Now we can get close to the gate. But first, give the woman all your coins. Afterwards, pick up the emerald stone she leaves behind. Use all your stones on the gate. Leave.
[wp_ad_camp_1]PART TWO: TAKE THE TRAIN TO FROZEN TEARS
Exploring the mine
Congratulations on your freedom! Now it’s time to pursue some answers as to your identity. Apparently those can be found at the village of Frozen Tears. How convenient that there’s a train we can take to get there!
First, we need to pick up the wheel that’s on the ground. Look in the rusty cart to find a photo. That’s the train we’re looking for. Then head right.
Speak to the sad-looking statue with the crows. Also, be sure to look at any and all signs from here on forward. Those apply to an achievement. Head to the right again.
Take the doll hanging from the bridge. Then speak to the bridge guardian. Seems like he wants us to prove ourselves to him. Head back to the sad statue and take the path up leading to the mines.
Ignore the house for now. Head right again.
We find a mine cart just outside of a mine entrance. To the left of this is a wooden sign. This one in particular has the solution to a later puzzle, so we should look at it. That done, go inside the mine.
To the left, just in front of the elevator, is a wheel on the ground. Take it. Return to the cart. Place the wheels on it. Then head left.
A spooky bird-like creature speaks to you. When he’s done, check the grated drain pipe in the upper right. Take the iron crank hidden there. Return to the mine. Enter it, then keep heading left past the elevator.
Use the crank on the wheel in front of the swinging dead horse. Use the crank. Take the button that is revealed. Head back to the mine elevator.
Examine the button mechanism and place the button you find on it. Press it. Enter the elevator.
Head left. Open the little box in front of the monster. Take what’s inside. Head back to the elevator.
Check out the creepy doll faces. It’s another puzzle. The final solution is below.
Use the strange mechanism we found in the space beside the puzzle. Then push the button with the picture of a drill on it. Head left again.
Well that worked! Take the animal part on the ground. Head left again.
Be sure to examine the carving in the wall for an achievement. Pick up the flashing crystals to the left. Examine the chest. Take the rope. It’s time to return to the surface. When you leave the mine, the entrance closes off. Head right, back to the small stone house.
The rat’s home
Use the green crystals in the lantern to the upper right. Enter the house.
We get to see more results of our moral choice from earlier. Take the stone tile offered. Examine the picture above the fireplace. Open the drawer to the left. Take the wooden figure. Give the small rat child the rag doll.
In the upper right corner, take the flat piece of metal hanging off the hook. Head down the ladder. Look in the barrel just in front of the ladder. It’s the answer to a puzzle in this room. Check the basket to the left for another wooden figure. Examine the shelves on the left wall to start the puzzle.
The pieces should be in this order:
Enter the new door. Something nasty is revealed: turns out the rat people lure victims to their home, then when they’re asleep, trap them in a cage to eat later! And from the looks of the room, they don’t kill them swift and mercifully either…
As you might have guessed, this is yet another moral choice. To make our decision, examine the panel on the wall near the door. Take the metal plate with the drawing on it, and place it on the panel to the left. Clicking the top and bottom panels reveals shapes that ultimately form an arrow either going up or down. This moral choice is another obvious one, but here it is regardless:
Evil: Press the button that drops the prisoner’s cage down a pit.
Good: Press the button that raises the prisoner’s cage to freedom.
Whatever your choice, you still get the train ticket. If you chose the good way, just head back upstairs to speak to the freed prisoner. If not, pluck the ticket out of the water you just drowned him in. Leave the house. Head left, back to where we saw the strange bird creature.
Getting the Storm Egg
Continue on past the bird creature till you arrive at the tower. Examine the sign just in front of the Ragman.
The sign we had looked at outside of the mine literally gave us the answer. The solution is:
5, 2, 4, 1, 3
Surprise! Of course it wouldn’t be that easy. It’s another cog puzzle, but with a sliding block twist. The video below has the solution.
After you’ve got the cogs in place, activate the switch on the left to kill the monster on the tower. Enter the building.
Be aware—reading all the books here nets you an achievement. Be thorough—it’s possible to miss one or two. Once you’re ready, head up the stairs.
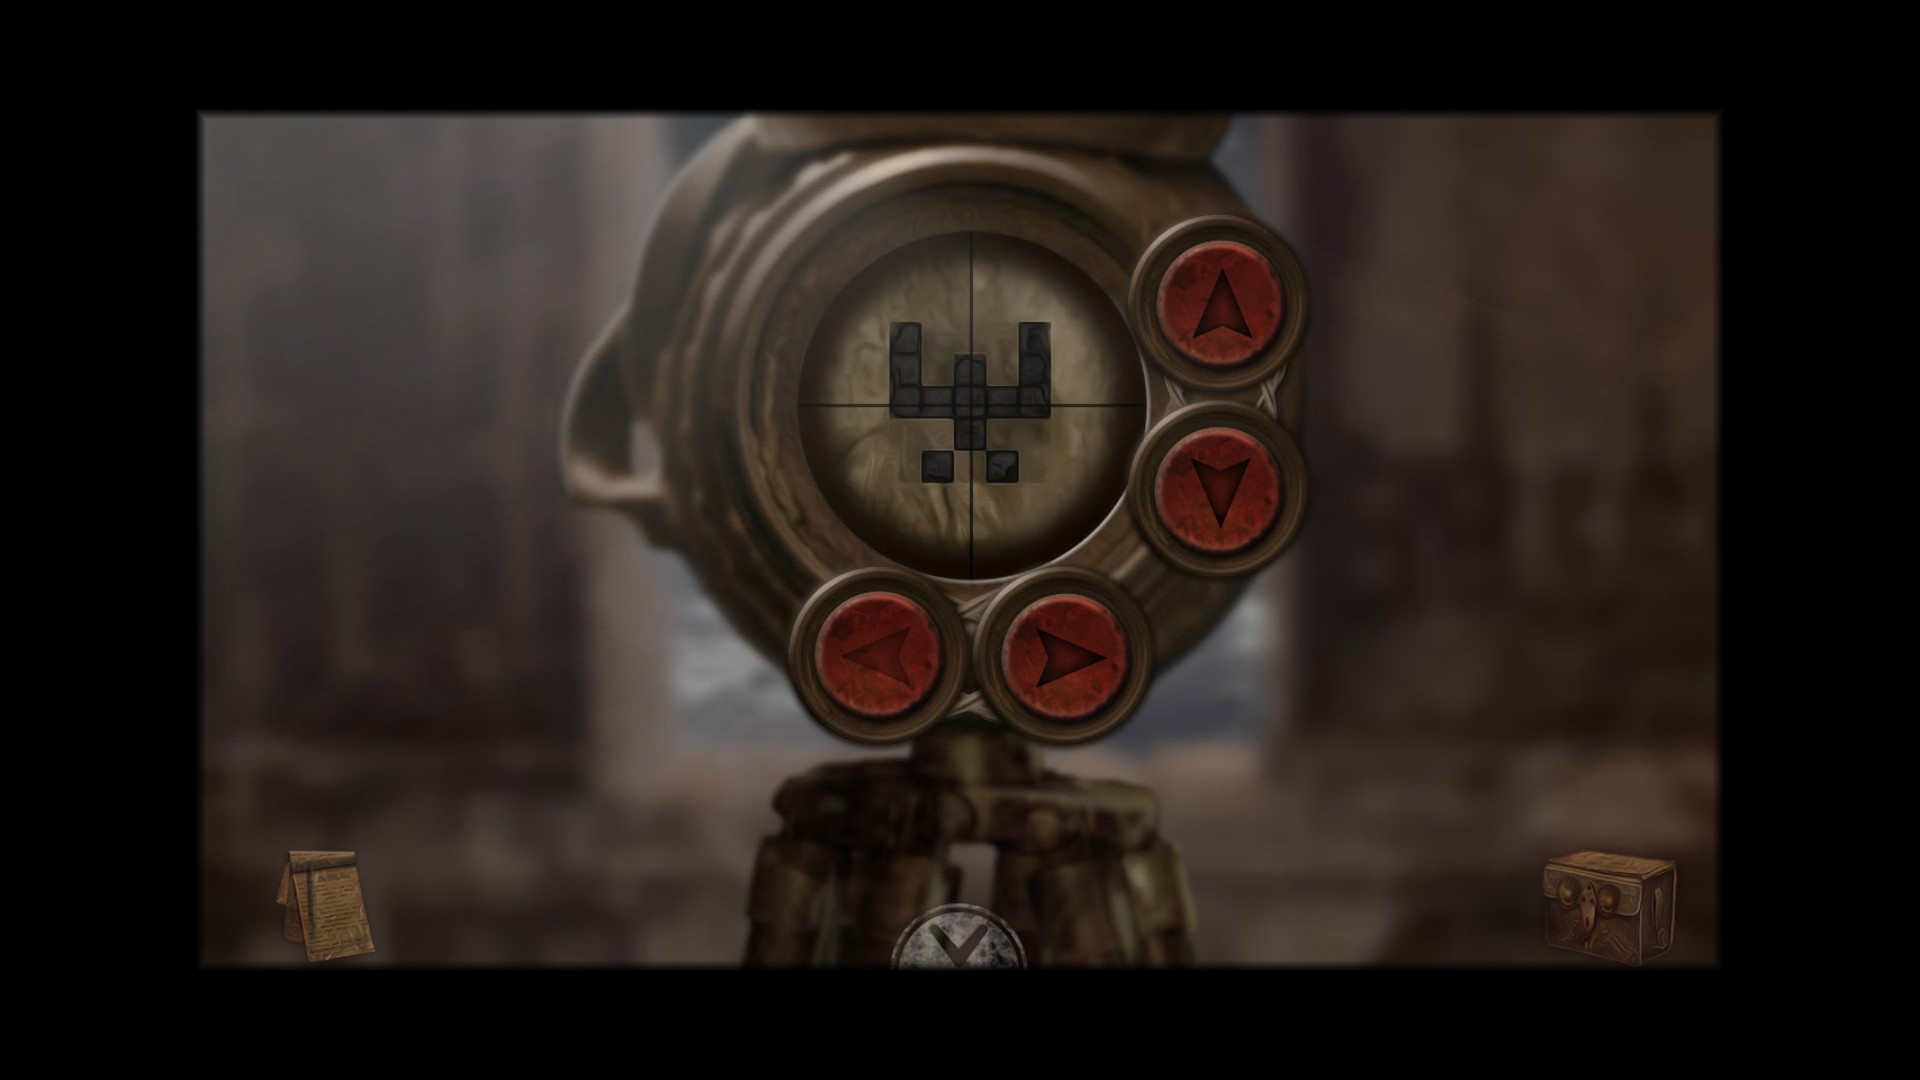
Take the tile offered to you. Ring the bell three times. Take the key that falls into sight. Look in the telescope to the right. Look left two, down one, left one. You should see this:
Head up the ladder. Use the key on the egg’s cage and take it. Use the rope on the hook to the left and head down.
You now have the opportunity to make another moral choice. You can either give the egg to the bird man, or the sad statue.
Evil: Give it to the bird man.
Good: Give it to the sad statue.
Either choice will result in you receiving the key needed to open the stone cache in front of the sad statue. If you’re not there already, go there and examine the rock with the camouflaged compartment. Use the key. Take what’s inside.
Getting the crown
Once you’re done, it’s time to return to the first area where we saw the photo of the train in the mine cart.
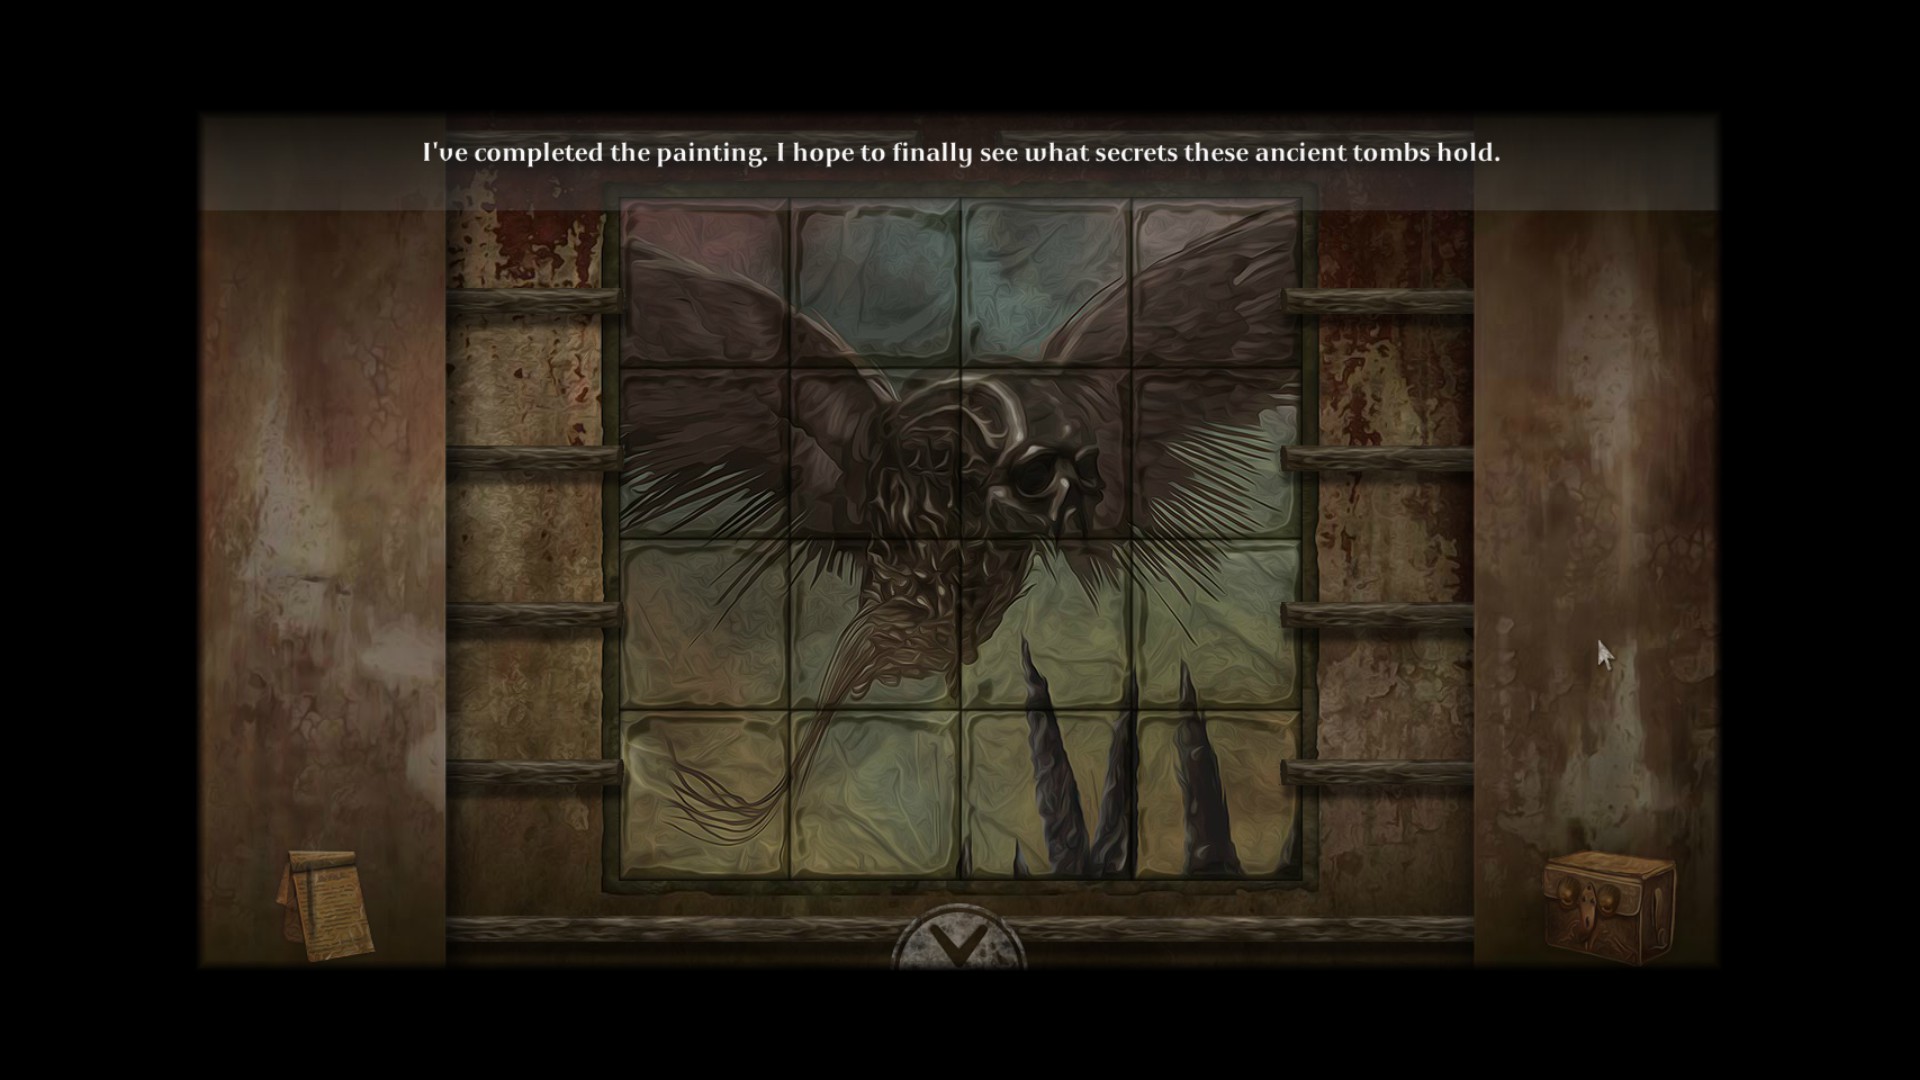
At the mine cart outside of the prison gates, head straight for the three statues in the distance. Look at the foot of the left statue for the names of IndieGoGo backers and a hangman drawing. Examine the stairs that have been revealed under the center statue. Place the missing tiles into the puzzle to begin. The picture should be arranged to appear like this:
When you’re through, enter the doorway. Examine the plaque to the right. Push the smoking part of the cube.
No, I did not lead you astray. This is what needs to happen. Examine the cube to start another puzzle.
It’s a memory game of sorts, except instead of finding the matching tile, you need to find its opposite. Before you start the game, you are shown the pairs that go together. Also, if you take too long, tiles are placed back on the board. Fortunately, tiles are returned to the same places, so you can easily eliminate them again if you remember where was what. There isn’t much support I can provide you here as it’s all random, but if you’re quick and paying attention, you should get it eventually. Press the fingerprint in the center to begin.
Upon completion of the mini-game, a doorway is revealed. Enter.
Look in the bucket next to the chair. A note inside of it gives us the information we need:
Their masks they don, the righteous five
That fateful day which none survive.
Twice the charge through the body surge-
‘Twas not enough for sins to purge.
Check the sink on the right for more:
The gathered cheer as life falls away.
Eyes feasting on this rite of decay.
Thrice bound, body charred, dry mouth’s last breath.
Another victim sentenced to death
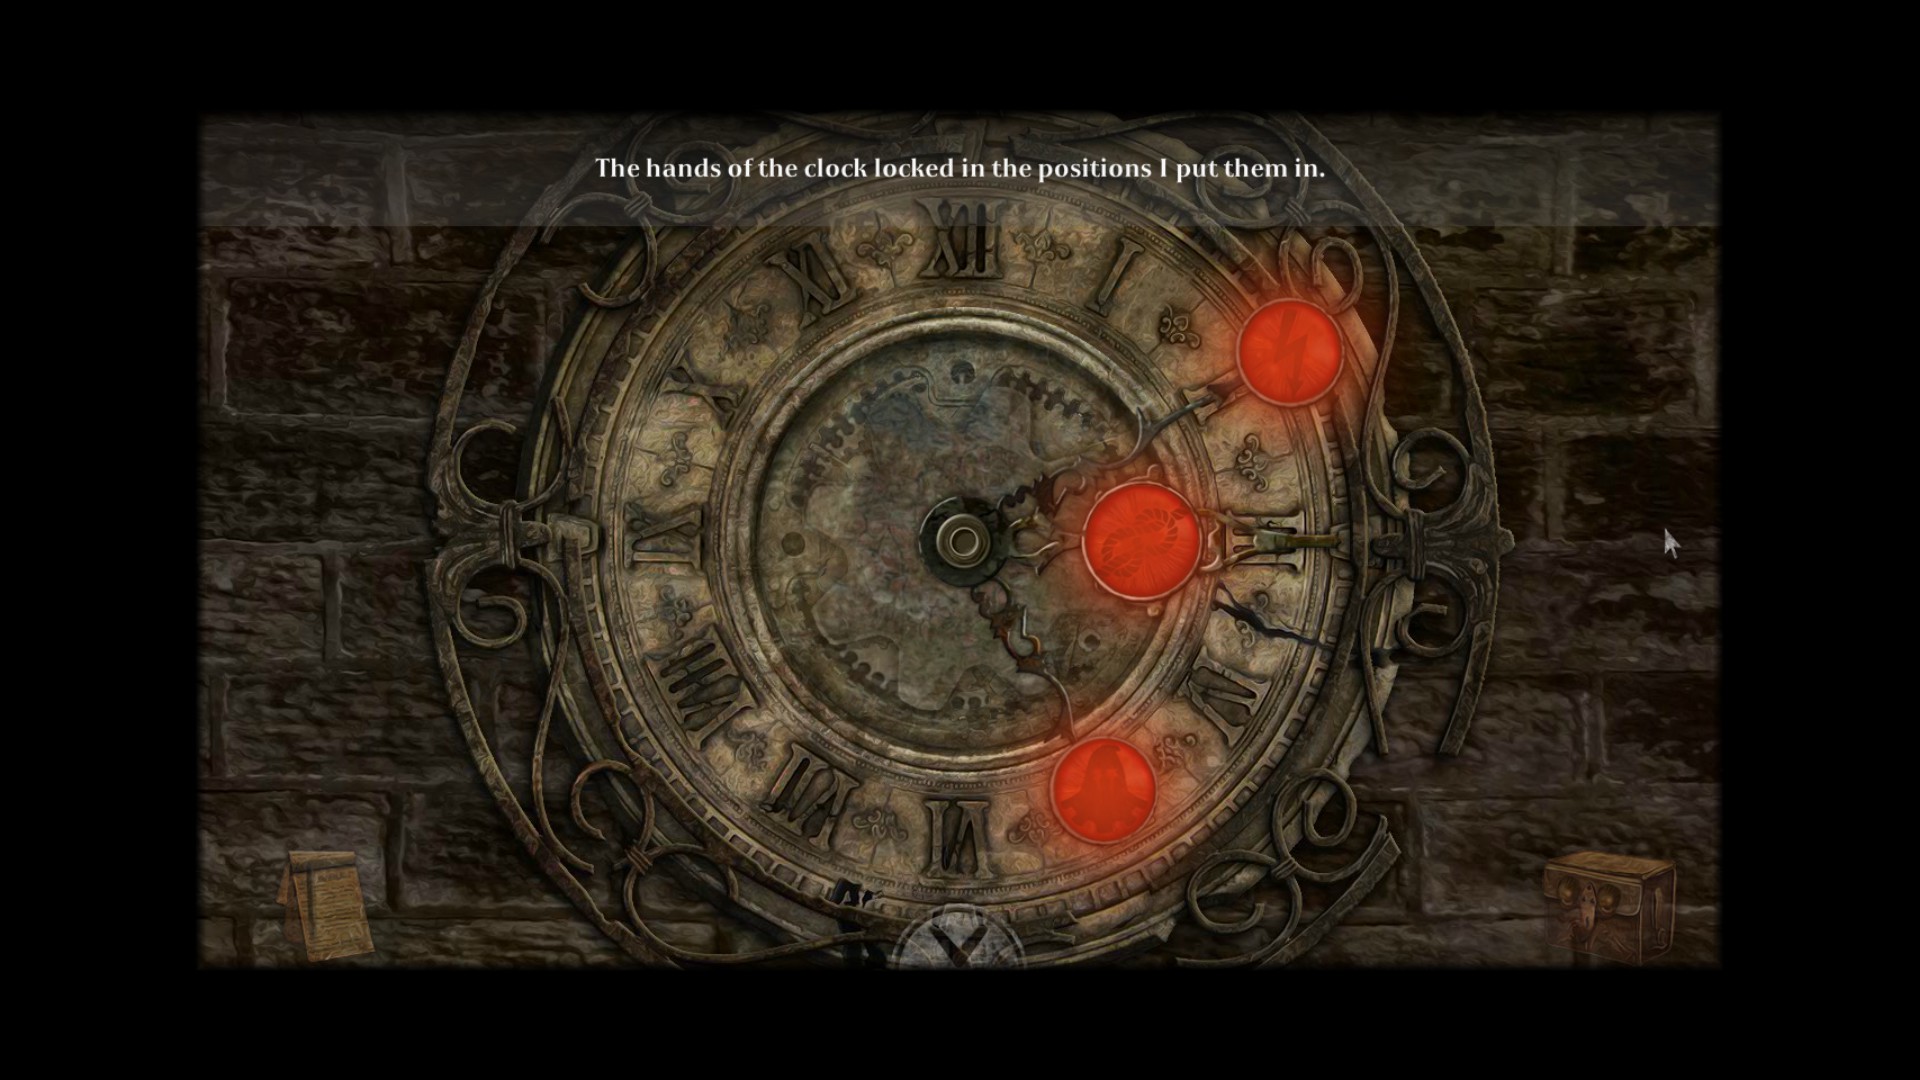
Exit this screen and examine the clock on the right. Put the executioner on five, the electricity bolt on two, and the rope on three, like so:
Pull the lever to the right of the broken window. Speak to the ghost. Take the crown. Exit this place by choosing the silver arrow at the bottom of the screen.
Now for another moral choice. Give it to the lizard, or the rat.
Evil: Give it to the rat.
Good: Give it to the lizard.
Whatever your choice, you will receive a piece needed to complete the puzzle up on the hill where the lizard’s tower is. Head up there now if you aren’t already there.
Getting on the train
Look behind the tower where there is a grated structure to the right. Place the piece you recently acquired into the panel.
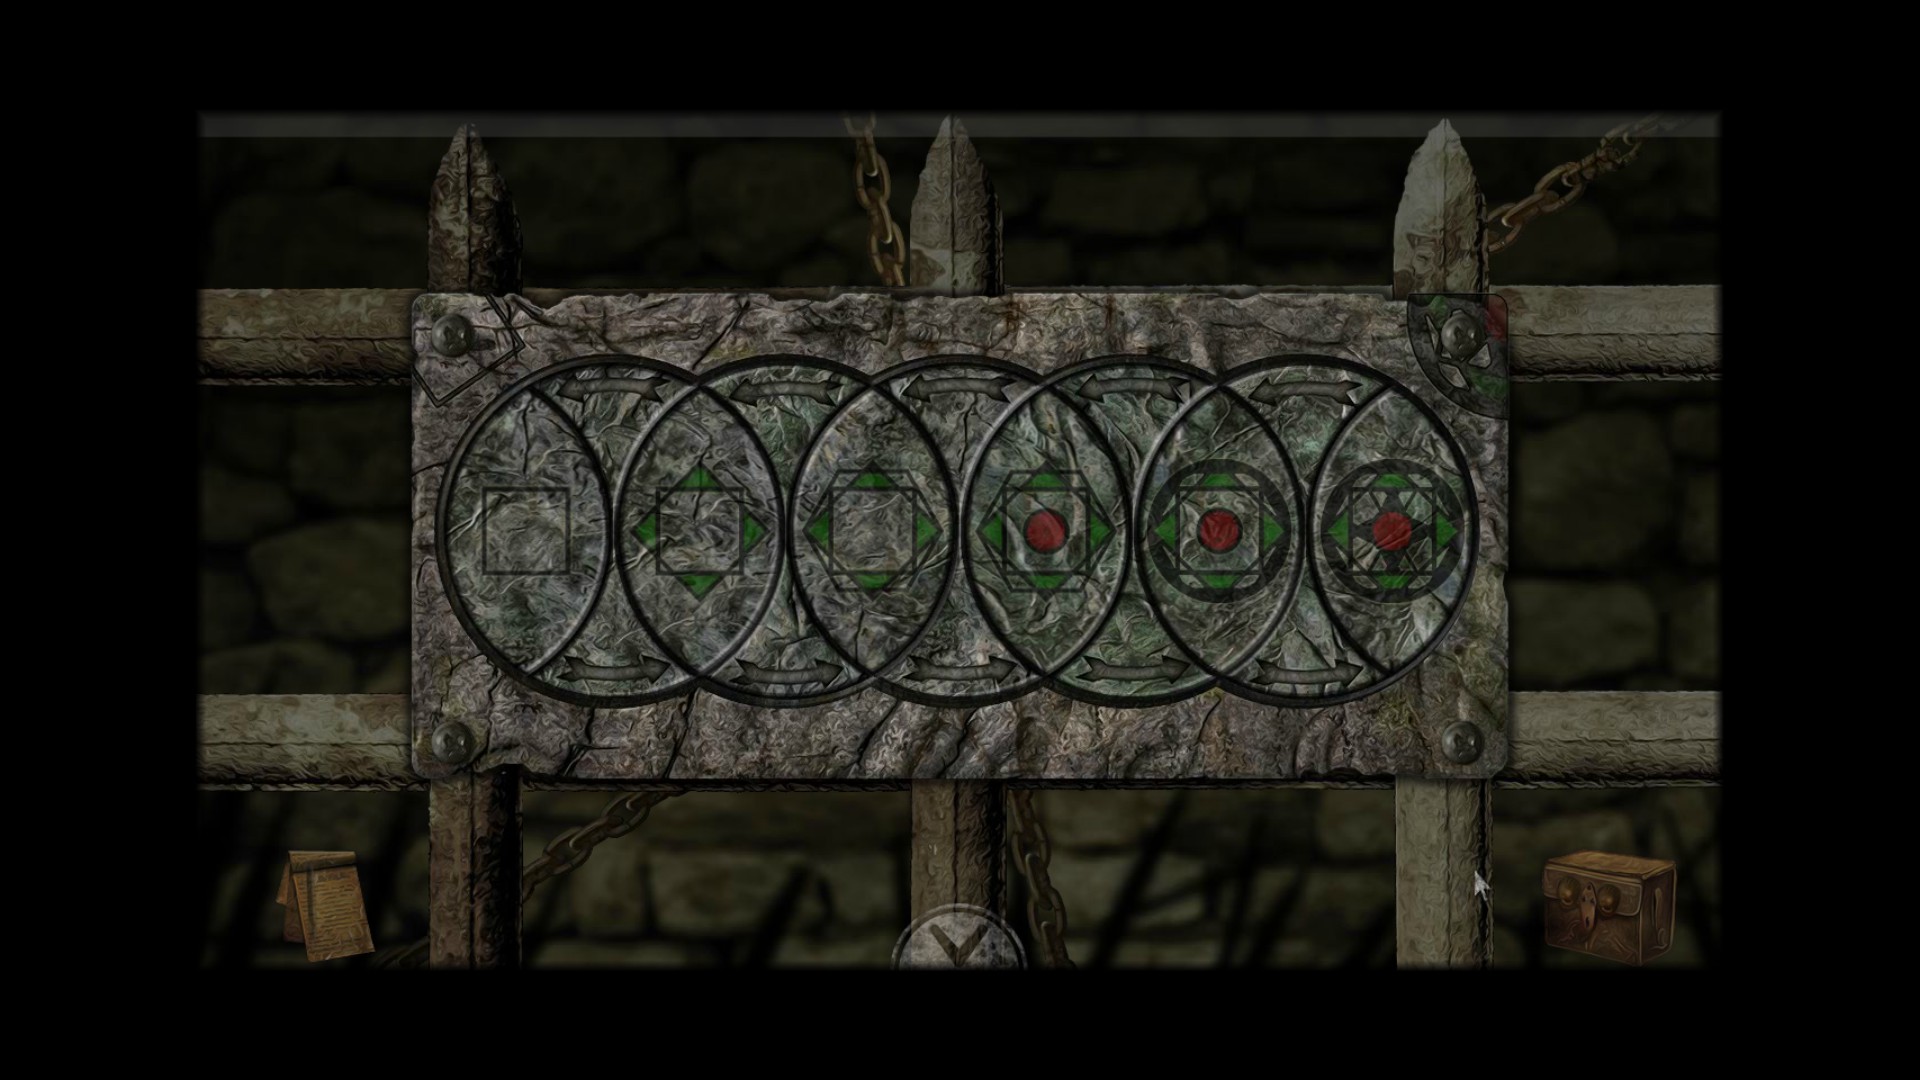
If you look at the upper corners of the panels, they hint at what direction these patterns ought to be going. Left is where plain square ought to be. Right is where the most elaborate, colorful piece ought to be. Clicking the arrows rotates the discs, moving the pieces along the board. The final solution looks like this:
Take the red monolith from the structure. Return to the rat’s hut and head downstairs to his torture chamber. To the left is a machine needed to compress the monolith into a fuel cell. There is a diagram on the wall next to the machine that instructs how to use it.
Once you have the fuel cell, return to the bridge. Give the mine monster’s claw to the guardian. Proceed right. Examine the door to the train. Make the shape we observed in the telescope, like so:
Enter the train. Give the man all the parts he needs: The fuel cell, the train parts, and the train ticket. Now it’s off to Frozen Tears!
PART THREE: FIND THE TRUTH AT THE STATUE
Disperse the poisonous fog
We’re in the last leg of the game. Exit the train, and head left to see some soliders training for what looks like an upcoming battle. Head right twice.
On a hill beyond the gate is the statue the Ragman has been dreaming of. Head right once more.
Speak to the man in the hat. Enter the house. Look at the drawing over the fireplace. Speak to the man again.
Leave the house and return to the gate. Things don’t look good outside. Continue left till you reach the area where the soldiers had been training.
Pick up the key the dying soldier tosses before you. Return to the gate and use the key.
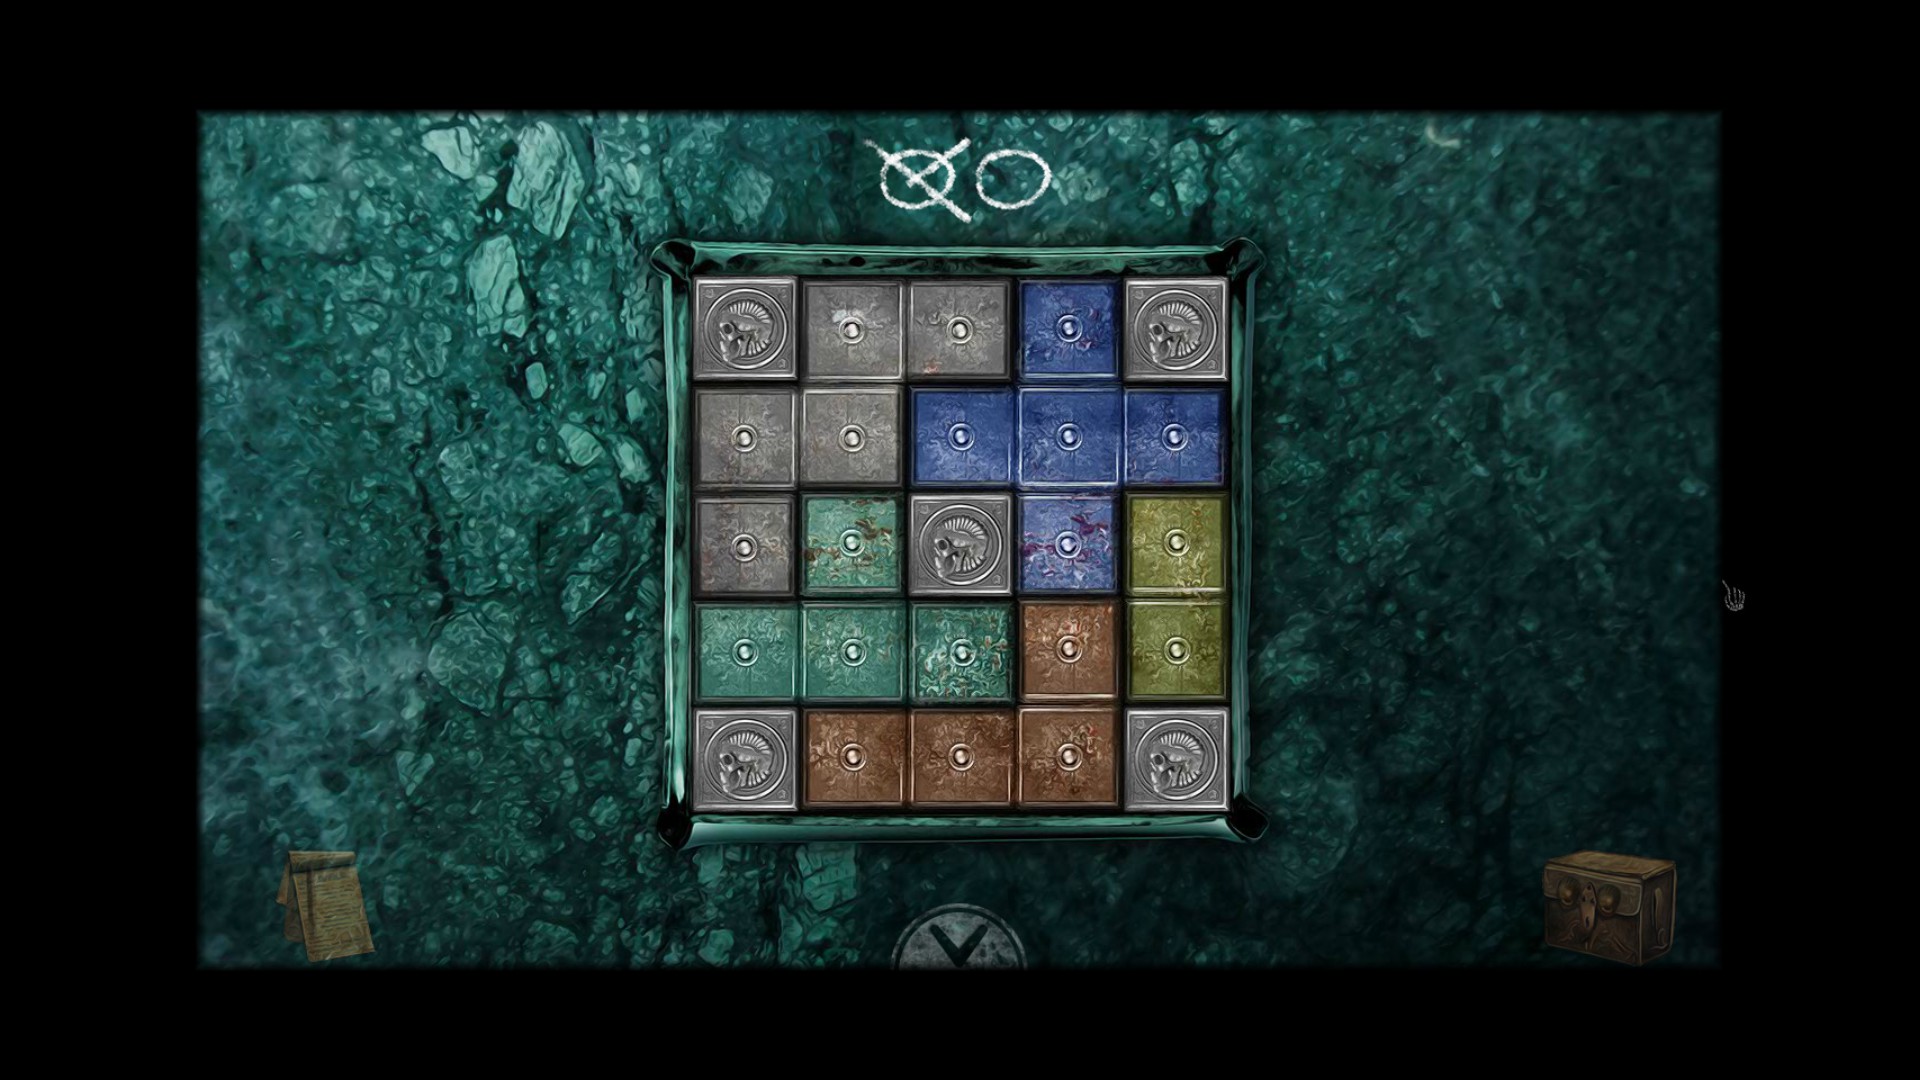
As you might have guessed, there was a puzzle hidden inside, and more sliding blocks no less!
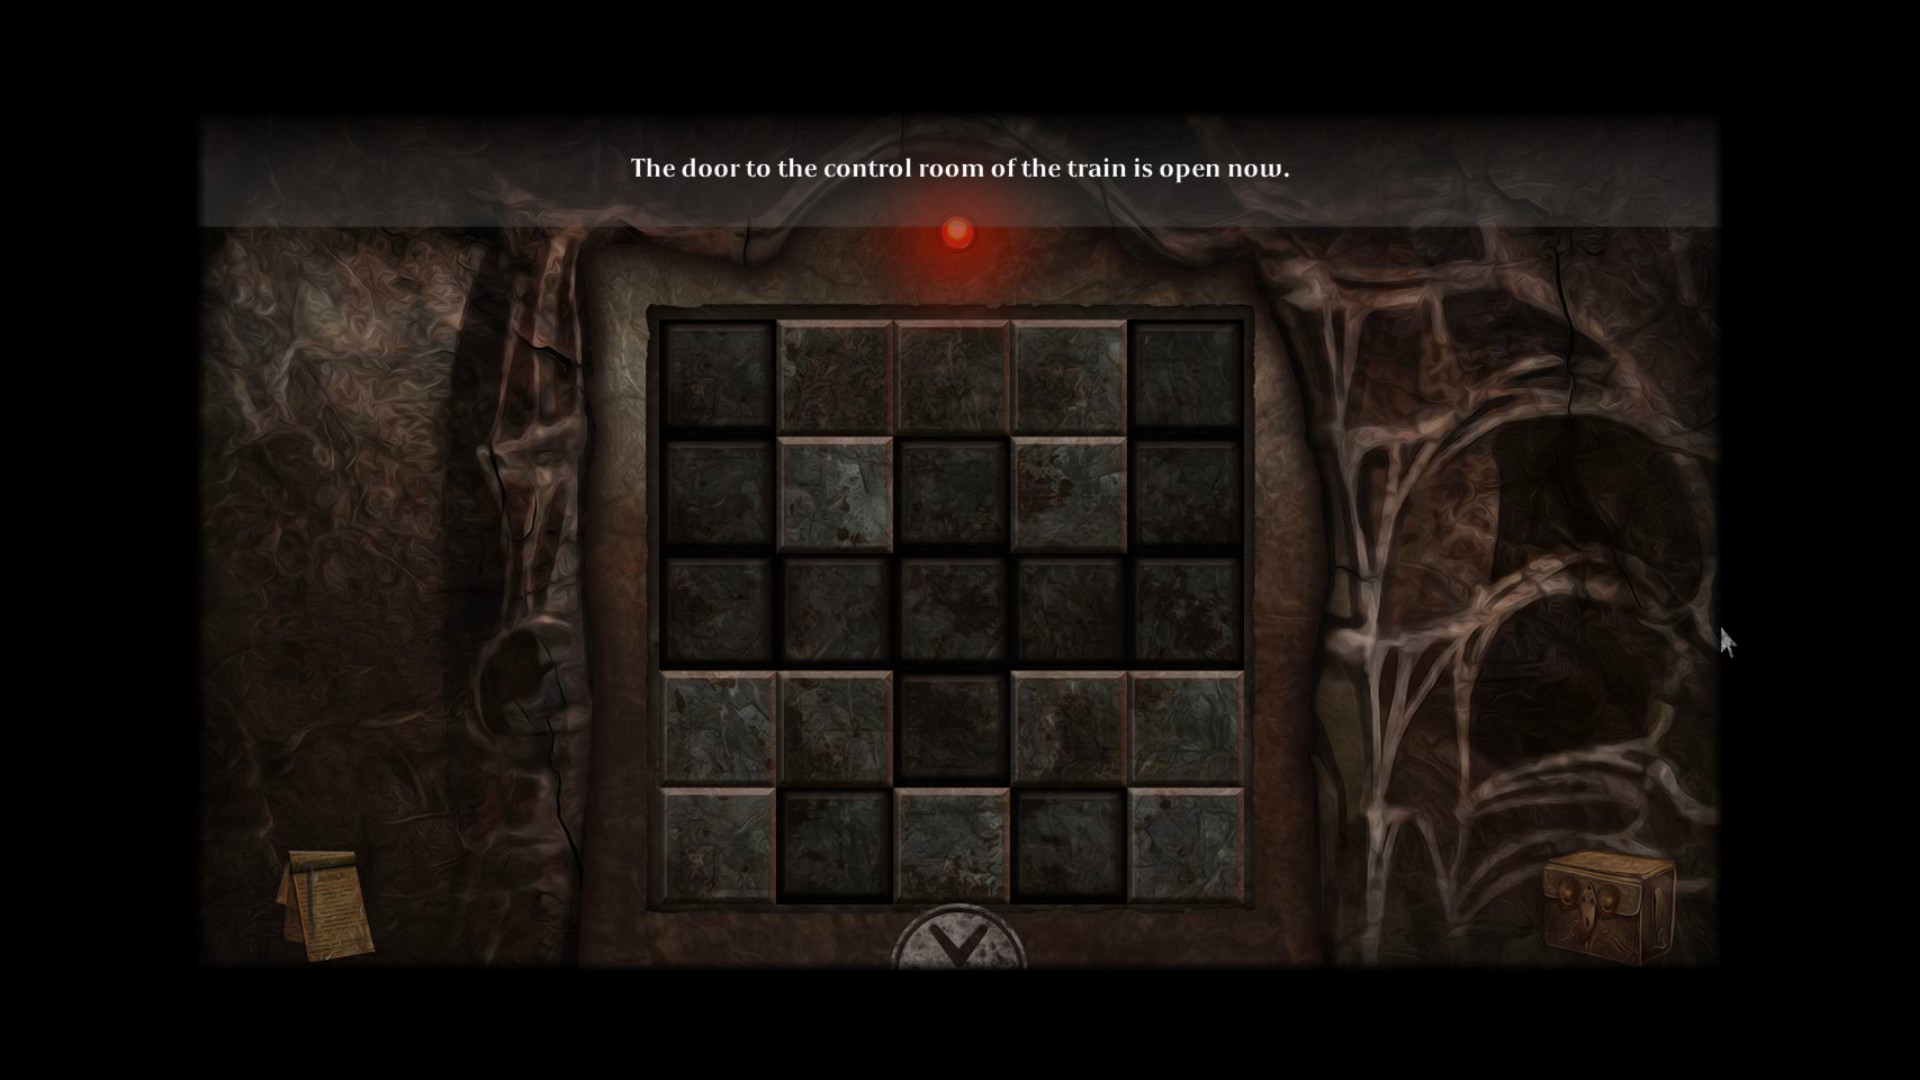
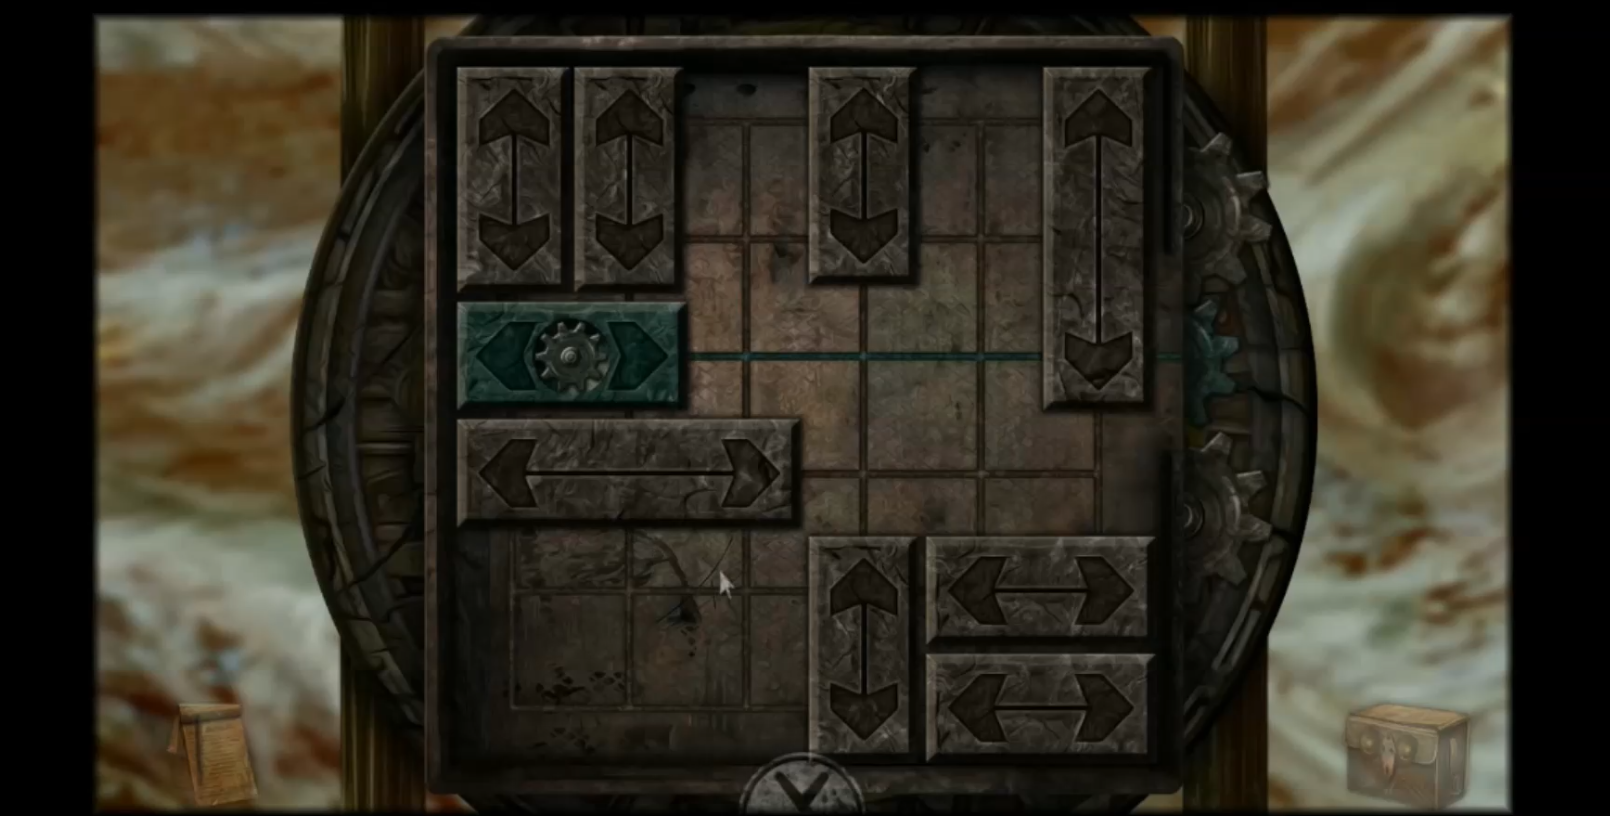
This one’s fairly straightforward: just drag the green block to the other side of the box. Below are the step-by-step instructions.

Step 7: Slide down the center vertical block and the long vertical block. Slide the green block all the way to complete the puzzle.
Once you solve the puzzle, head straight through the gate.
Take the glowing flower in the boat. Head straight. Take the glowing flower to the left. Head straight. Take the flower to the left. Then head back two screens till you’re back at the flowered boat. Enter the doorway.
Go left. You’ll see a dark man facing the wall. This is the mage the soldier mentioned. Speak to him. Take the flowers he offers you. Go right. Click on the weird machine to the right of the table. Put the flowers in it.
When the jester appears, you are given a moral choice. Free him, or leave him for dead.
Evil: Leave him for dead.
Good: Free him.
Whatever you decision, head right to speak to the mage again. He will give you a pouch of powder you can use to disperse the poisonous fog. Take it. Be sure to look in the hole he had been standing in front of for an achievement. Leave for the field with the fog.
Use the bag of powder at the field. Fun fact! There’s something hiding inside the large dead animal…
The blind man’s paintings
Head straight for the cathedral. The door is locked, but on either side are two statues on pillars. The pillars have drawings on them that are very alike the recent note we took in our journal. Click on the left pillar to begin.
Turn the pieces horizontally till the pillar looks like this:
Then click the right pillar and make it look like this:
Enter the cathedral. For an achievement, look at every single painting in this place. Head straight, then enter the door on the left. Speak to the blind man. Take the brushes he offers you.
Afterwards, the cat makes you a counter offer. You can either pick up the knives and do what he says, or ignore them and follow the man’s instructions.
Evil: Slash the paintings.
Good: Restore the paintings.
Whatever you choose, you’ll have part of what you need to make the sword. Remember the achievement I mentioned! When you’re done, leave and the door will seal behind you.
The villagers’ revenge
Once you return to the field head left, then straight, toward the burning buildings.
To the left, you’ll see the result of your choice for who takes the crown. Speak to the fellow sitting on the right. He wants you to find the one who brought this destruction on his people.
Return to the blacksmith’s house. Move your cursor to the right to follow the trail of blood to the roof. The bird man speaks to you, relating how his lust for more eggs led to the destruction of Frozen Tears. He’s dying and just wants to be left alone.
You’re teleported back to the vengeful villager from before, and you are left with a choice. Let the villagers carry out their justice, or shelter the birdman.
Evil: Reveal the birdman’s location.
Good: Keep the birdman’s location secret.
Discover the Truth With the Sword
The villager will leave, allowing you access to the instrument he had been sitting on. Well, he said the music will show us the way, so we shall let it lead us!
Examine the instrument. This one took me a while. The notes are right-side up, but the actual instrument is upside down. You’ll have to play the melody in the right order by matching the symbols in the sheet music. Counting the instrument keys from left to right (including the black keys), there are 13 keys total. Play them in this order by their corresponding number:
5, 5, 8, 7, 4, 6, 6, 9, 1, 2, 13, 5
Don’t worry about being quick or anything. Just play them in the right order.
Take the disc that has appeared in the stone to the left and head back a screen. Examine the floor of the gazebo to the left.
It’s another puzzle. Place the stone disk in to begin.
The lines just need to match up. Click the discs to slide them along to a free space. The solution video is below:
Take the metal. Return to the blacksmith. Give him what materials you gathered. Take the sword. Return to the statue. Use the sword on the statue. Enter the portal.
Head right. Speak to the creepy cloaked people and they tell you that you need to choose between a key of light and darkness. If you choose the key of darkness, you are later forgiven for one misdeed. If you haven’t committed any evil acts, then you can still choose the evil key without consequence. After you’ve made your decision, go left two screens.
Speak to the hooded figure sitting on the beast. Enter the glowing opening. Then enter the elevator.
When the cut scene has ended, place the key on the scale. If you, for some reason, mixed up your moral choices (some good, some evil) chances are you will be condemned for having “committed too much evil.” Whatever your result, I hope you sit back and enjoy your ending for Tormentum: Dark Sorrow!
Hopefully this guide was of use to you. If you have something to add, please share it below!
And be sure to check out some of Cliqist’s other game guides for help through your favorite crowdfunded games!






[…] Tormentum: Dark Sorrow Game Guide […]
Excellent guide. I got stuck a few times while playing (mostly due to my own negligence in searching) but I was able to complete it successfully.
I’m glad it was of help to you! If there are any other guides you’d like to see on
Cliqist, just let us know!
Really awesome guide Amanda, I just finished the game and it really has a lot of special moments that make you revaluate your life before its too late..funny thing, art.. either way thanks for making my gameplay smooth when i was stuck 🙂
No problem, Daniel!
great review, but the piano part is wrong, it has 12 notes, not 13, and im stuck 🙁
Absolutely fabulous guide. Written guides are getting harder and harder to find; especially good ones. While I like watching video walkthroughs once I’ve played the game, I like using written ones to go through the game myself. Thank you so much for this comprehensive guide.
LoL finished without guide, i am pure evil LOL..sometimes its not about chosing mostly, dont know what to do and forced to choose lol
amazing app anyways
LoL finished without guide, i am pure evil LOL..sometimes its not about chosing, mostlydont know what to do and forced to choose lol
amazing app anyways